Screen Language #9 - Coding GUI #3
Choice Screen
Welcome to Coding GUI #3! I hope you're enjoying this series so far.
In it, we're replacing all the default Ren'Py assets with our own. So far, we've been over the Main Menu in Part #1 and the Textbox (a.k.a. dialogue box) in Part #2. And from the title, you know the choice screen awaits us today.
I don't like long intros, so let's dive in. But first, what exactly is the choice screen?
The choice screen represents in-game menus, created inside labels with menu statements.
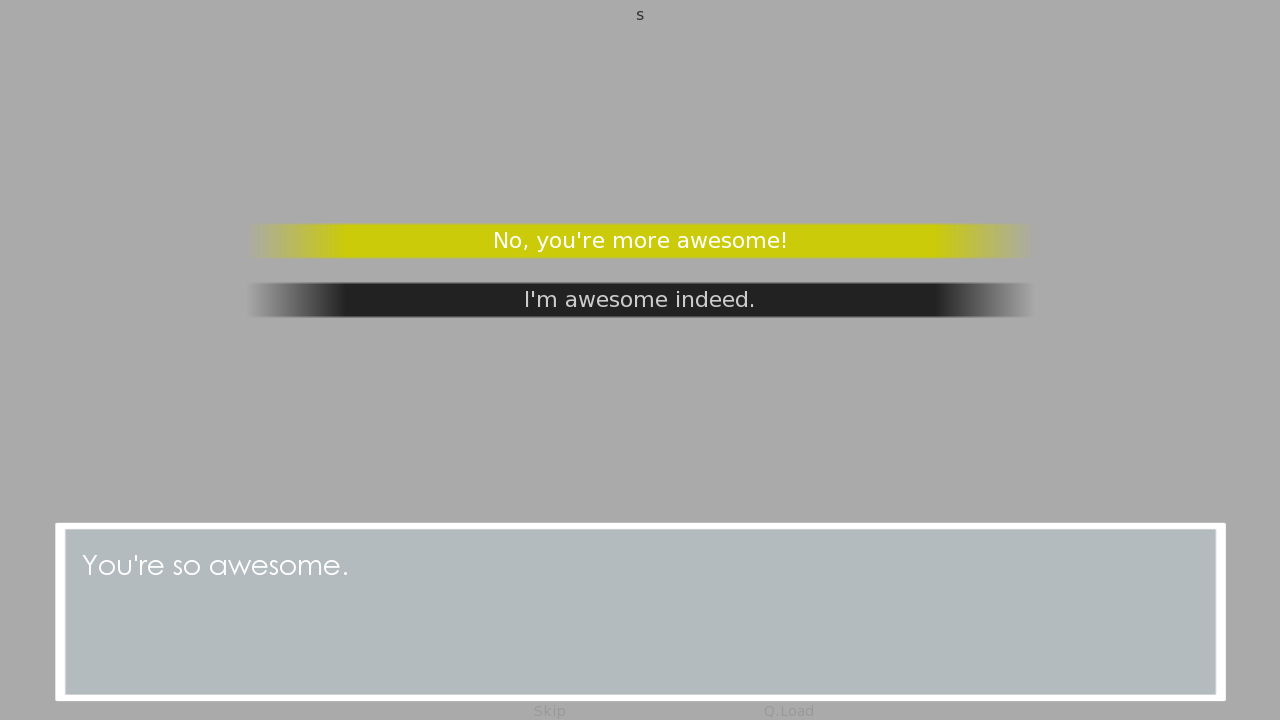
To remind ourselves what the default one looks like, here's a screenshot of a simple menu with two options available, the first one hovered over with a cursor.
I've added the scene statement before the menu to give us a grey background, and included a dialogue lines inside the menu so that our amazing textbox is shown.
As with the previous two screens that we've worked with, we're gonna grab the code from screens.rpy and put it into a standalone file, choice.rpy for this one. The code starts on line 199 in a new file, and if you're following my tutorials, it should start around line 123, as the say screen that we cut last time was written above it.
The entirety of the screen code is as follows:
## Choice screen ###############################################################
##
## This screen is used to display the in-game choices presented by the menu
## statement. The one parameter, items, is a list of objects, each with caption
## and action fields.
##
## https://www.renpy.org/doc/html/screen_special.html#choice
screen choice(items):
style_prefix "choice"
vbox:
for i in items:
textbutton i.caption action i.action
## When this is true, menu captions will be spoken by the narrator. When false,
## menu captions will be displayed as empty buttons.
define config.narrator_menu = True
style choice_vbox is vbox
style choice_button is button
style choice_button_text is button_text
style choice_vbox:
xalign 0.5
ypos 270
yanchor 0.5
spacing gui.choice_spacing
style choice_button is default:
properties gui.button_properties("choice_button")
style choice_button_text is default:
properties gui.button_text_properties("choice_button")Following the pattern of previous tutorials, we'll now deconstruct all of this code to understand how it works. But unlike the previous two, this time, I'll be talking about the screen code first, and then about the styles.
And strap in.
# Choice screen
screen choice(items):
style_prefix "choice"
vbox:
for i in items:
textbutton i.caption action i.action
## When this is true, menu captions will be spoken by the narrator. When false,
## menu captions will be displayed as empty buttons.
define config.narrator_menu = TrueThe first line, of course, defines the choice screen. What's very important is that the screen takes an argument called items, stated by writing the argument name inside parentheses that follow the screen name.
Arguments involve some Python talk, but don't worry, I'll stick to as little theory as possible this time.
items are a list of MenuEntry objects. For example, when a menu with three options is shown, the list will look like:
[MenuEntry, MenuEntry, MenuEntry]
Each of the MenuEntry objects holds all the information about one choice of the menu. Every MenuEntry holds five variables, and every variable holds a different piece of information. There are five in total (caption, action, chosen, args and kwargs), but we'll focus only on the two most important ones:
- caption, which is the text of the choice
- action, which is the screen action that leads us to whatever that choice does
All of this is bread and butter of the whole choice screen, and we will use it just after we give a quick rundown of the few lines that follow:
- The style_prefix statement tells the screen to use styles beginning with choice_
- The vbox statement (First encountered in Screen Language #2) puts all the buttons into a column
- The for statement creates a textbutton for every item in the items list - i.e. for every MenuEntry.
The textbutton is where we use the variables from MenuEntry. We put caption as the text of the textbutton, and we hook up action to the action property so that an appropriate thing happens when that textbutton is clicked.
Since in the for loop, every item - every MenuEntry - has been called i, we can read the variables with i.caption and i.action.
Finally, there's a define for the config.narrator_menu variable. This - just like some of the things we've encountered in the original say screen - is a thing kept for backwards compatibility (meaning, older code functions the same even in newer Ren'Py versions).
Value of False was used in the past, so it was kept as the default, and it gets overwritten in newer versions by this line here.
If you want to know what it does when the value is False: If there is a dialogue line included in the menu (like my "You're so awesome."), it will not be shown by say screen and will instead be passed as the first MenuEntry in items. If you try this with new code, it's, simply put, unusable - click here for a screenshot.
When I saw this, I went to discuss it with the higher-ups, and it was decided that this line wouldn't be included in Ren'Py 7.5 and newer. As a result, if you have this part in your code like I do, keep it (although I'll exclude it from further code blocks in the tutorial), and if you have newer code, the part won't be present and you don't have to worry about it.
And that's the screen. Just six lines, but it does so much stuff.
Hopefully you understood it with my explanation. Next, we can talk about the styles included.
# Choice screen
style choice_vbox is vbox
style choice_button is button
style choice_button_text is button_text
style choice_vbox:
xalign 0.5
ypos 270
yanchor 0.5
spacing gui.choice_spacing
style choice_button is default:
properties gui.button_properties("choice_button")
style choice_button_text is default:
properties gui.button_text_properties("choice_button")There are three styles used by the choice screen - choice_vbox, choice_button and choice_button_text.
First, the styles import all their defaults through the is statement:
- choice_vbox adopts all the properties of the default vbox
- choice_button adopts all the properties of the default button
- choice_button_text adopts all the properties of the default text inside a button
And after that, more specific settings are added:
- choice_vbox is aligned horizontally to the middle of the screen, and vertically to the top side of the screen - this way there's space at the bottom for the possibly shown textbox.
There's also the spacing of choices set, taken from the gui.rpy file. - choice_button has all of it's settings pulled from gui.rpy.
- choice_button_text also has it's settings pulled from gui.rpy.
As for where they're used, I don't think that needs much explanation, but just in case:
- choice_button is used by the buttons representing every choice.
- choice_button_text is what the text inside the buttons looks like.
- choice_vbox is the vbox that holds all the choices.
And that's it for all explanations. Now we can begin replacing stuff.
The Pleasant Afternoon pack I'm using does not include assets for the choice screen, but fortunately, one of the members of my Discord Server has been kind enough to make some for me! Not much is required, all we really need is a background for the buttons in three different versions.
The versions we're familiar with by now:
- idle version, shown when the cursor isn't on the button
- hover version, shown when the cursor is on the button
- insensitive version, shown when the button cannot be clicked
You can grab these three files below.
As usual, I'm getting rid of the styles, since we don't want the properties from gui.rpy messing with ours. Removing the styles means removing the style_prefix statement from the screen as well.
I will also add some comments, because this code definitely deserves it.
# Choice screen
screen choice(items):
# Vbox holding all the buttons
vbox:
# For every MenuEntry in items
for i in items:
# Textbutton for every choice
textbutton i.caption:
idle_background "afternoonGui/choice/idle.png"
hover_background "afternoonGui/choice/hover.png"
insensitive_background "afternoonGui/choice/insensitive.png"
action i.actionMuch nicer. The result, however...
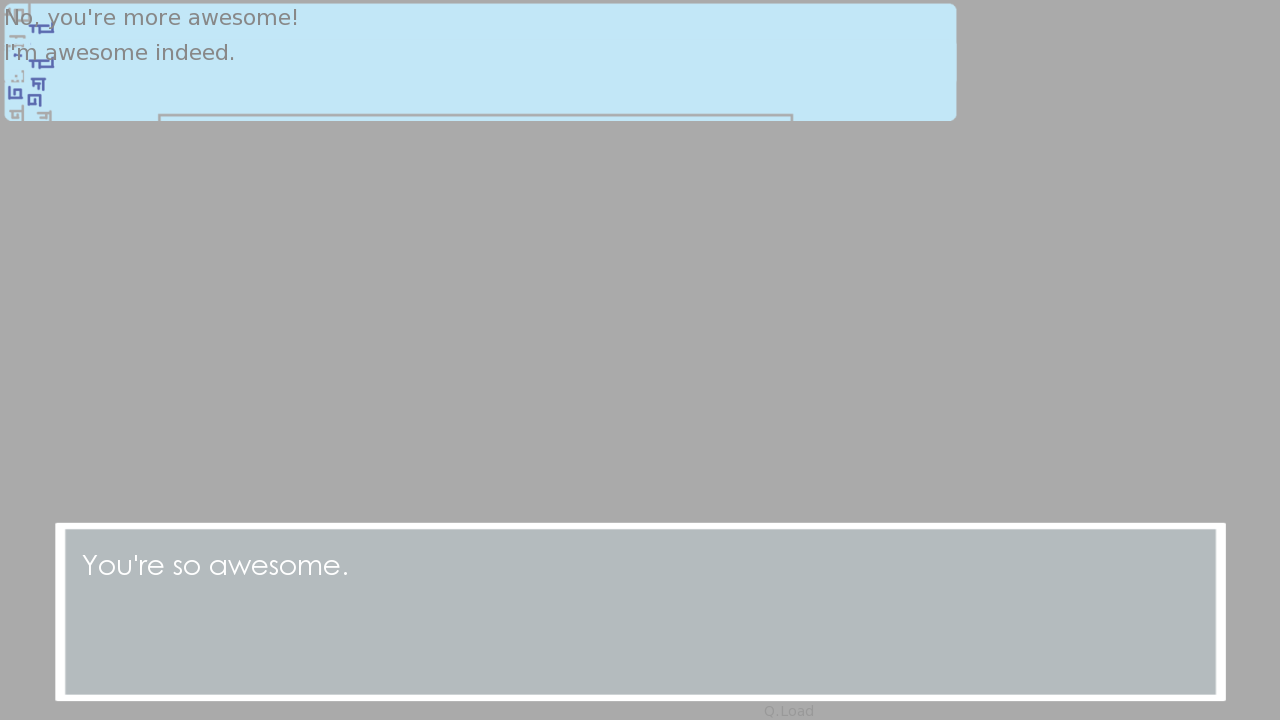
With all properties gone, everything kinda broke apart. Now, let's give it all our own properties to put it back together. There will be a fair few, but they've all been covered in my Screen Language tutorials, so I'll first go over them before showing you the code.
First, a simple align for the vbox to place all the choices in top middle - just like the default style had it, we want to keep extra space at the bottom in case we need the textbox shown.
After that, two more properties under the textbutton:
- xysize to set the size of the button (same size as our image)
- align to move the text to the center of the button
Just these three changes alone are enough for the screen to start looking pretty usable. Here's how it would look right now, with my cursor hovering over the second choice.
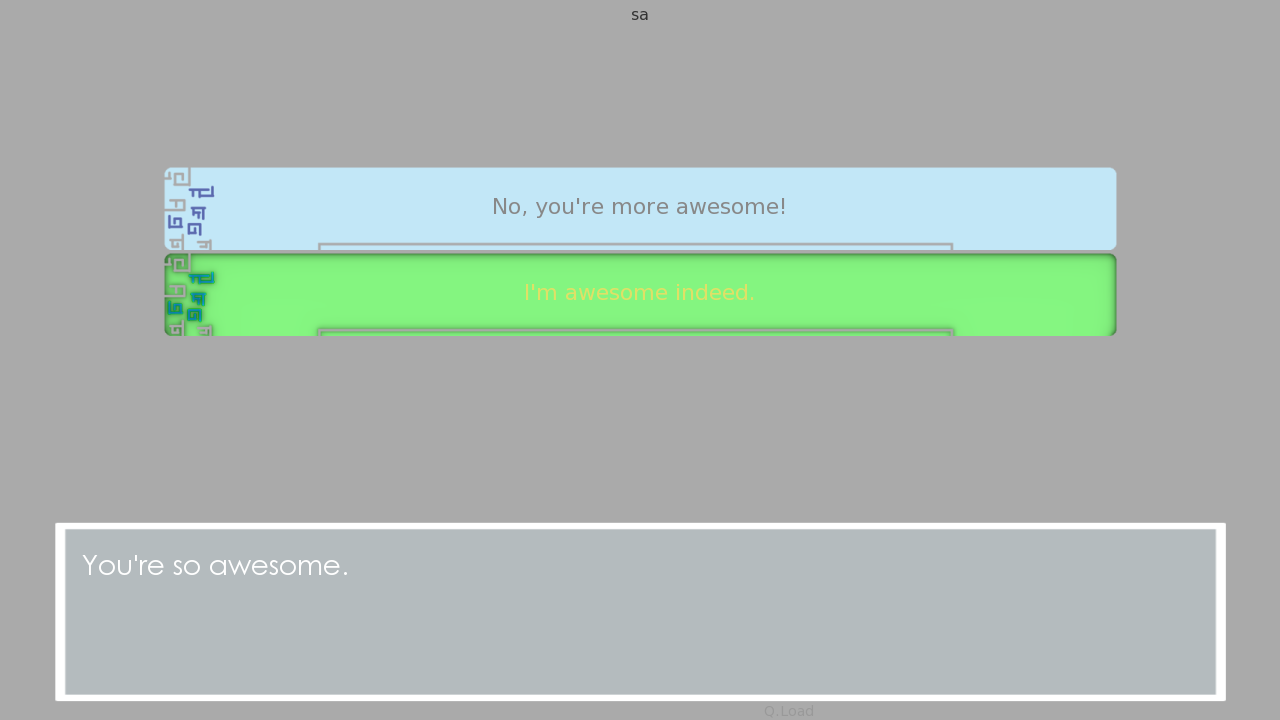
Okay, what else is there? We need to space out the choices, and we need to make the text prettier - especially the hover version, since right now it's barely visible.
For the spacing of vbox, I just guessed 30px and that looked good to me.
For the text properties, we have to put in a bit more work:
- Good old minerva.ttf font, also used by the dialogue
- size to make the text larger
- color to color the text, I thought black looked nice for both idle and hover
- insensitive_color for grey color when insensitive
While the black color fits the text, the insensitive versions are usually grey, to stress that they are unavailable, which is why I'm including a grey-er color for it.
And at this point, you might be wondering where is this insensitive stuff even used? Don't worry, we'll get to that. But first, now that we've been over all the properties, let's look at the current code.
Savour it, it's beautiful!
# Choice screen
screen choice(items):
# Vbox holding all the buttons
vbox:
align (0.5, 0.3)
spacing 30
# For every MenuEntry in items
for i in items:
# Textbutton for every choice
textbutton i.caption:
idle_background "afternoonGui/choice/idle.png"
hover_background "afternoonGui/choice/hover.png"
insensitive_background "afternoonGui/choice/insensitive.png"
xysize (960, 86)
action i.action
# Text properties
text_align (0.5, 0.5)
text_font "afternoonGui/fonts/gothic.ttf"
text_size 28
text_color "000"
text_insensitive_color "8f8f8f"And look how awesome it looks in-game, with the second choice again hovered:
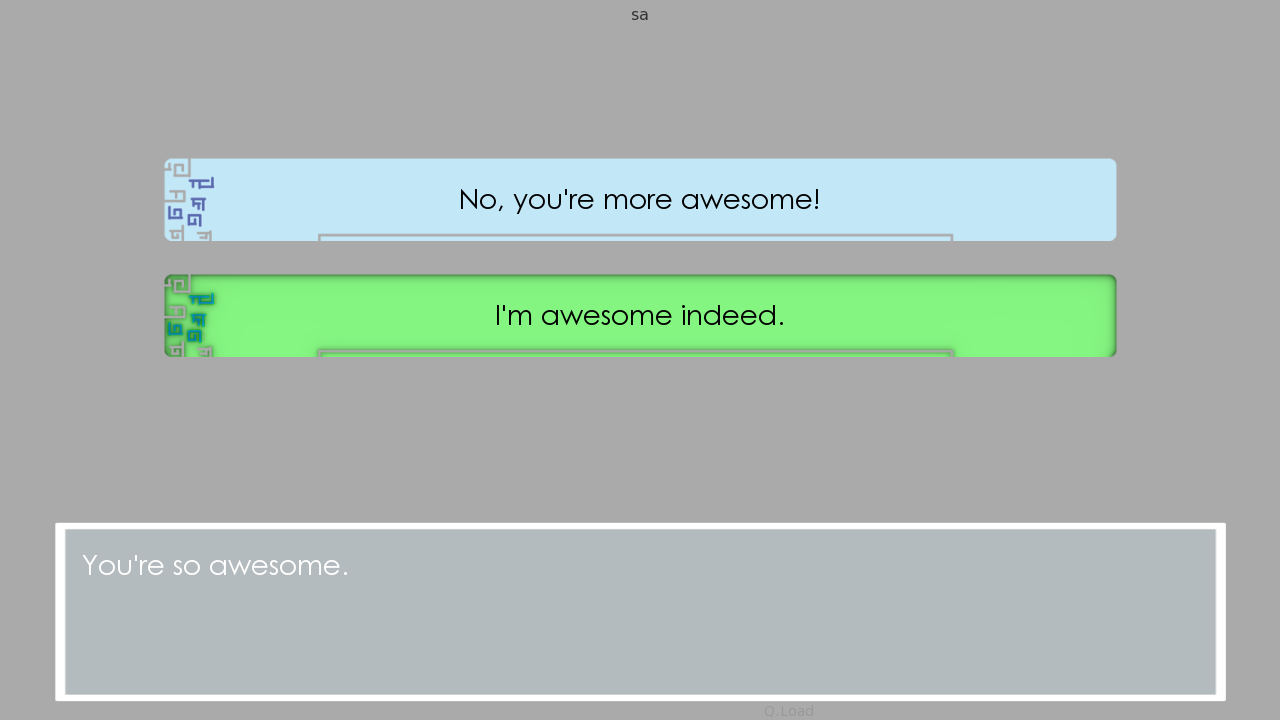
And that's the choice screen all done and ready!
...What, did that come out of nowhere? Well, it is a simple screen, so there isn't much more to change. Or... is there?
Because the count of mere five code blocks is very below-average for my tutorials, I thought I would spice it up with two more features.
But, if this is where you want to get off, feel free to do so!
Just know that there are cookies waiting for you at the bottom that you'll be missing out on.
Now, the two changes that I thought we could do are some of the things I like to do in my own projects:
- Making unavailable choices visible
- Make choices appear in random order
The first change is, of course, where we finally get to see our insensitive background and text_color! And all we need to set it up is change the config.menu_include_disabled variable to True. In the next code block, I'll show you the code of the menu that I've been using, and set the variable there.
"But Lez, there are three choices in the code, we've only seen two in the screenshots!"
There were three all along you fools, ahahahahahahah!
define config.menu_include_disabled = True
# The game starts here.
label start:
scene sa
menu:
"You're so awesome."
"No, you're more awesome!":
pass
"I'm awesome indeed.":
pass
"Oh stop bragging." if False:
passThe reason why you've seen only two choices in the screenshots is that config.menu_include_disabled is False by default. This makes unavailable menu options not appear. Now that we've changed it to True, the unavailable choice appears alongside the other two.
And since I'm still hovering over the second choice, we get to see all three images at once. How nice is that?
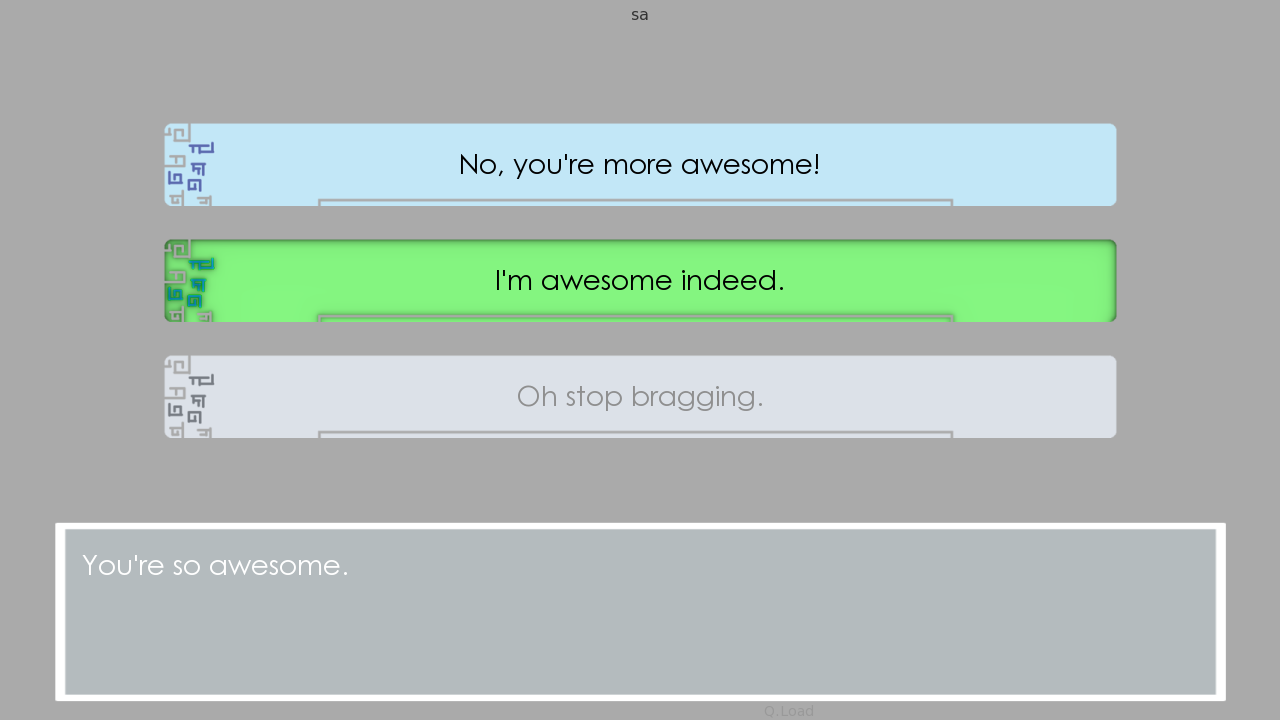
I think including the disabled choices has a great effect. The player can note choices they'd like to choose on their next playthrough, and it gives them an idea of how big the game is, too.
Imagine that you, as a player, get to the final confrontation in a game, and see that you can only pick three choices out of six. How would you react?
Personally, I'd go "wow, there's so much more to this game than I've seen so far!" And I'd be excited to replay the game.
Now, the second change. Here is where I get excited, since we have some Python coming up. But don't be scared! It's just couple of lines. I do think all of them will look fairly unfamiliar to you, but as usual, I'll be sure to explain everything.
init python:
from random import shuffle
# Function that returns a shuffled list.
def shuffleList( l ):
shuffle(l)
return l
# Choice screen
screen choice(items):
# Do NOT do this!!
# $ shuffledItems = shuffleList(items)
# Shuffled version of items
default shuffledItems = shuffleList(items)
# Vbox holding all the buttons
vbox:
align (0.5, 0.3)
spacing 30
# For every MenuEntry in items
for i in shuffledItems:
# Textbutton for every choice
textbutton i.caption:
idle_background "afternoonGui/choice/idle.png"
hover_background "afternoonGui/choice/hover.png"
insensitive_background "afternoonGui/choice/insensitive.png"
xysize (960, 86)
action i.action
# Text properties
text_align (0.5, 0.5)
text_font "afternoonGui/fonts/gothic.ttf"
text_size 28
text_color "000"
text_insensitive_color "8f8f8f"Often when we write Python code in Ren'Py, we put the write it into init python blocks. These blocks of code execute when the game is launching (init stands for initialization), and are used to set up stuff - define and run functions, define classes and their objects, and more.
If you don't know what those are, don't worry - we're about to see one function right now, and we'll definitely talk about classes some other time.
Just remember, we're writing Python code now!
First, we need to import the shuffle function from the random module. Python consists of many modules that provide all sorts of functionality, and import allows you to use the ones you want in your code.
The def statement tells Python that we're defining a function. I named the function shuffleList, as it's purpose will be to shuffle the order of choices before they are shown on the screen. If you remember, all the choices are held as MenuEntry objects inside a list. This list will be passed to this function as the l argument.
Inside, the list named l is first shuffled through the imported shuffle function before it is returned. This will make more sense in a just a moment.
That's it for the Python code. The second part of changes is done inside the choice screen, where we will pass the items passed to the screen to the shuffleList function and store the returned list in a variable called shuffledItems.
That's a lot of terms in one sentence, take time to re-read it as many times as you need.
Now, you might know that Python code can be run inside screens with the help of the $ sign - but this can be a terrible idea.
Screen code is run very often. In our case, it means the items list would get shuffled on every screen interaction. Screen interactions are things like button clicks, keypresses like screenshots (did you know you can screenshot in Ren'Py games with the S key?), entering a menu and more. And that's not nice.
This is why we need to store the result of shuffleList inside a defaulted variable. default is only run when the screen is shown, not every interaction.
With that, all we need to change now is make the for loop use the new shuffledItems instead of the passed items.
And boom. The choices are now shuffled!
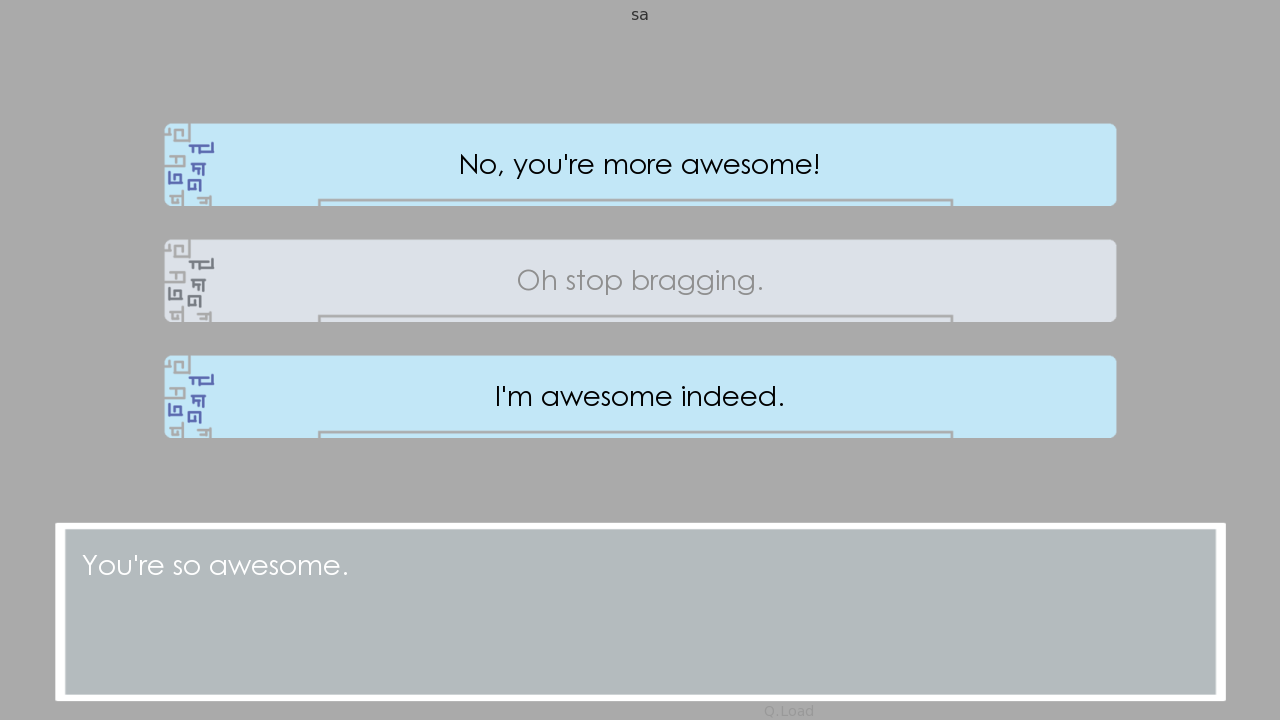
One tiny modification we should do to this.
Right now, if we rollback (mouse wheel up, which moves the game back to previous dialogue) and then go back forward, all the choices will be shuffled in a different order.
This is because the random.shuffle is not rollback friendly - After all, rollback is a Ren'Py thing, and this is Python code we're using here.
Thankfully, the random module is used so often that Ren'Py has made it's own version of it, which is rollback compatible. As such, instead of using random.shuffle, we can use renpy.random.shuffle instead, and that's the problem solved.
# Function that returns a shuffled list.
init python:
def shuffleList( l ):
renpy.random.shuffle(l)
return l
# Choice screen
screen choice(items):
# Do NOT do this!!
# $ shuffledItems = shuffleList(items)
# Shuffled version of items
default shuffledItems = shuffleList(items)
# Vbox holding all the buttons
vbox:
align (0.5, 0.3)
spacing 30
# For every MenuEntry in items
for i in shuffledItems:
# Textbutton for every choice
textbutton i.caption:
idle_background "afternoonGui/choice/idle.png"
hover_background "afternoonGui/choice/hover.png"
insensitive_background "afternoonGui/choice/insensitive.png"
xysize (960, 86)
action i.action
# Text properties
text_align (0.5, 0.5)
text_font "afternoonGui/fonts/gothic.ttf"
text_size 28
text_color "000"
text_insensitive_color "8f8f8f"You've reached the True Ending of Coding GUI #3. Along the way, you've read about:
- What the choice screen is
- The screen's items argument, which is a list of MenuEntry objects, each MenuEntry containing piece of information about one choice in the menu
- What styles are used by the choice screen
- Changing the background of the choice buttons
- Adding properties to the screen to make it look all nice and shiny
- How to make even unavailable choices appear
- How to shuffle the items list
- How the random.shuffle function works and how it's different from Ren'Py's version, renpy.random.shuffle
Honestly, this feels like a short tutorial to me, but when I look at the bar on the right... You know, the one you can drag to quickly move the page? It's kinda small. So, I guess it's for you to judge.
We've covered plenty of theory in Screen Language tutorials in the past, so I want to keep showing you more default screens - they're something you'll be looking into in your projects sooner or later. In Coding GUI #4, we will look at the Preferences screen, which lets players change their settings. It also includes a statement we haven't yet encountered - bar, which creates a bar with a slider that you can drag, to adjust things like volume.
Thank you for reading, and I believe I promised you cookies!
There you go. Also made by one member of my Discord Server - I love my community. Don't be shy and come say hi, chat and/or ask questions!
