
Git Tutorial #1
Your First Repository
With the installation behind us (hopefully? Read Part #0 if you haven't!), we can now learn the basics of how Git works.
To start using it to track your progress, you first need to open the folder containing your project and create a repository. Repository (or Repo) is a hidden folder containing all the records related to tracked folders and files.
Note: Tracked and Untracked files is an actual Git term.
A repository can only track items in the same folder and present subfolders, so it should always be in the base folder of your project.
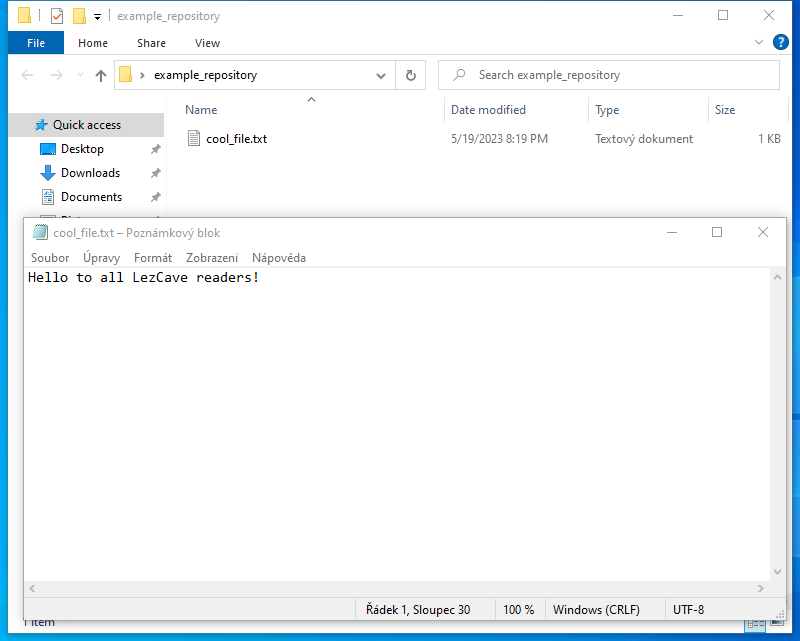
I've created an example_repository folder as the base, and now I'll go ahead and create a file that the repository will be able to track. It will be just a plain text file named cool_file.txt, with only one line of text inside.
An interesting thing I've also just noticed which is completely out of topic: Notepad mentions its line endings, CRLF, at the bottom - those line endings that were mentioned during the Git Installation Process.
Now that we have a file, we can go ahead and create a repository to track it.
Starting out, we will be using Git Bash for our needs. It is a terminal for git commands, but don't worry, using it is easier than it looks, and it lets us focus on function over form. It's how I started out, and it helped me work with GUI programs afterwards - which we'll use from Part #3 onward.
As with any terminal, we need to open it in the folder where we want it to do stuff. If you left Windows Explorer Integration ticked during Installation, you'll be able to simply right click in your project folder (example_repository folder in my case) and find the Git Bash Here option present there.
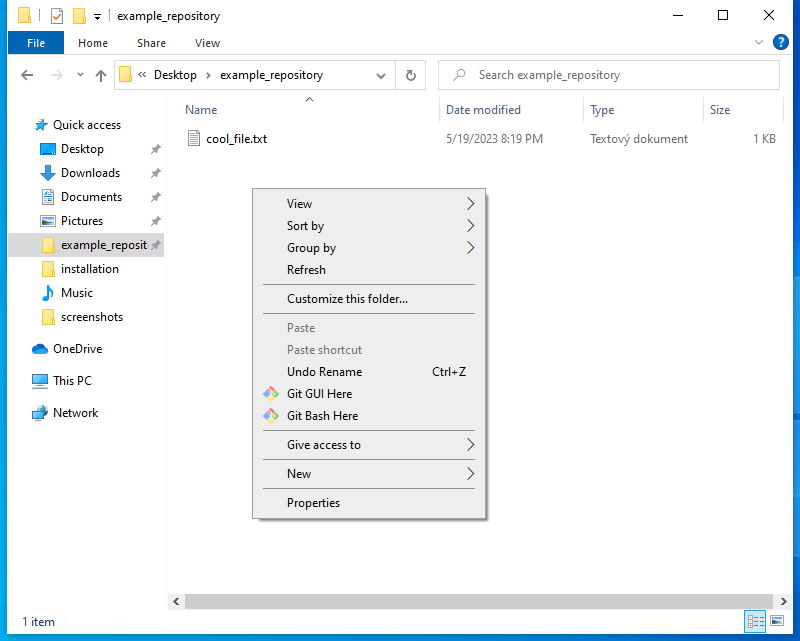
If you unticked it, you'll need to open Git Bash and navigate to the project folder using the cd <path> command. Hey, I told you you'd need it.
The Bash is open. Time to start typing commands.
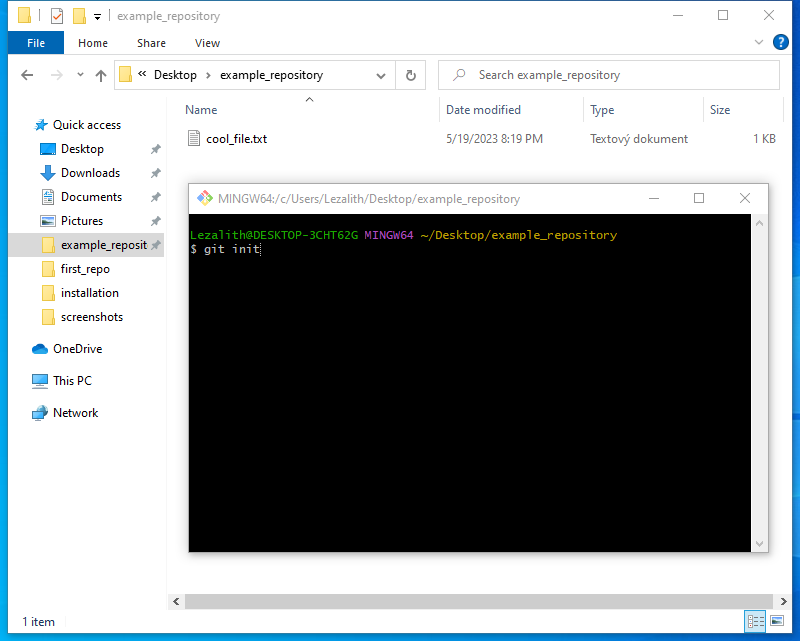
To create a new repository, we use the git init command (init stands for initialize). After pressing Enter, a message should be printed out about the repository successfully created.
Notice how simple the command is, and I promise that will be a theme for all the commands we encounter across Git tutorials.
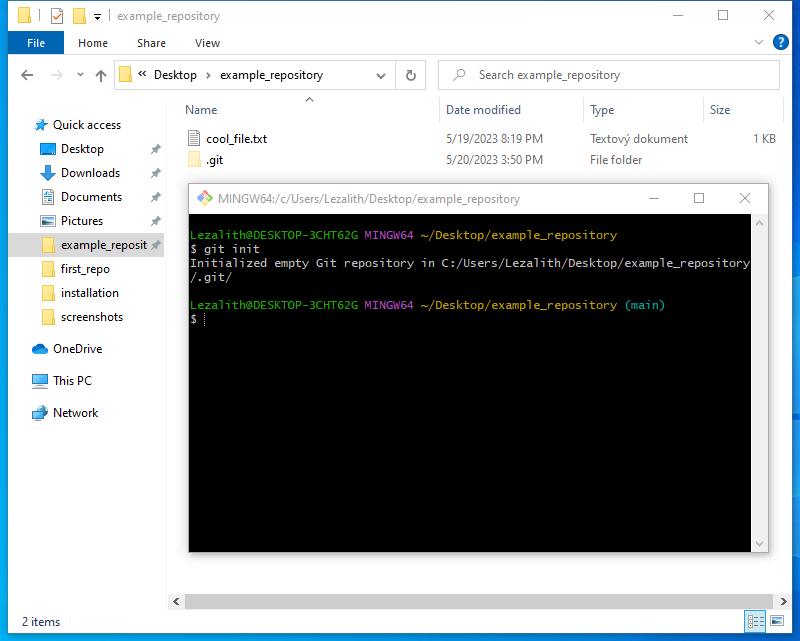
After inputting the command, a message saying the repository was successfully initialized should be printed out. If you're able to see hidden folders, you'll see the .git folder created inside the folder where Bash was opened.
Visibility of hidden folders can be toggled in Windows Explorer under the View tab, by ticking´/unticking the Hidden Items option. Right above it is the toggle of File Name Extensions, another option that I find invaluable, not only when working with Git.
And that's it, your first repository. You can take a moment to celebrate now.
The repository doesn't track any files yet. cool_file.txt is lonely, untracked and frustrated. In fact, we can visualize this despair with probably the most useful command of all:
git status
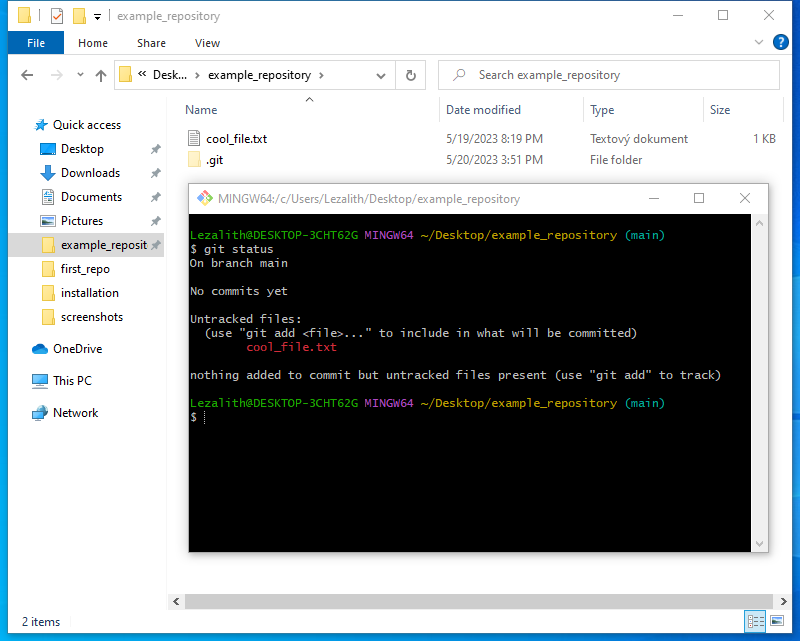
This command shows all the important information about the current state of the repository.
First, it shows the name of the branch we're currently working on. Multiple branches can be used to create different versions of your project, or develop new features separately. When a repository is initialized, it always has a single branch, main - or whatever you chose during Installation, possibly the default of master.
Notice how the current branch is also written in cyan color behind the repository name.
"No commits yet" shows how many commits have there been so far, and your progress relative to the currently uploaded version, if you're working with sites like GitHub.
What follows is the most important section: any file that is in the same folder or subfolders as the repository and isn't currently tracked will be listed under Untracked files. The command to start tracking a file is provided here, we'll be writing that one next.
Final piece of info is whether there are changes ready to be commited - a term you will understand by the end of this tutorial.
Let's finally set the repository to track cool_file.txt with the aforementioned git add command. All we need to do is follow it up with all the files that we want to track. Since we only have the one, the command is:
git add cool_file.txt
Following it up with a git status command once again, this is what we'll find in the terminal.
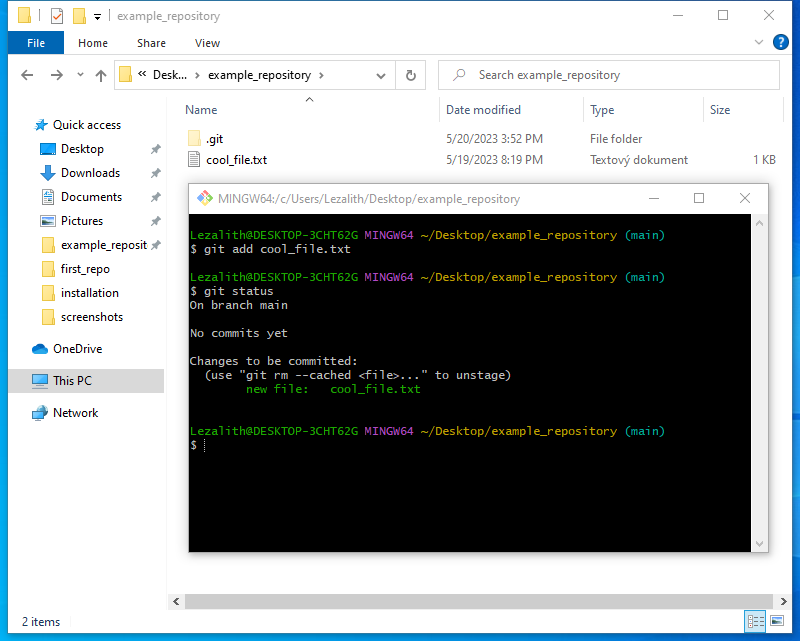
The Untracked files section is now gone, as there are no untracked files present.
What we see instead is a new change to be commited. Following the format of change type: file name, it tells us that a new file was added: cool_file.txt.
There are multiple types of changes alongside new file, notably modified file, renamed file and deleted file.
cool_file.txt is now what we call staged - marked to be included in the next commit. And now that I'm starting to use the word more and more often, let's talk about what commits actually are.
On the Git Tutorials intro page, I say commits are sort of like checkpoints for your progress. They're points in time between which changes are recorded, and they allow you to do all sorts of things - for example, you can revert the state of your project to any previous commit, be it temporarily or permanently.
And now that we have a staged change, nothing is stopping us from creating our very first commit.
Or... Is there?
Commits are created with the git commit command. I'll explain it later, since if I run it now, the following message comes back:
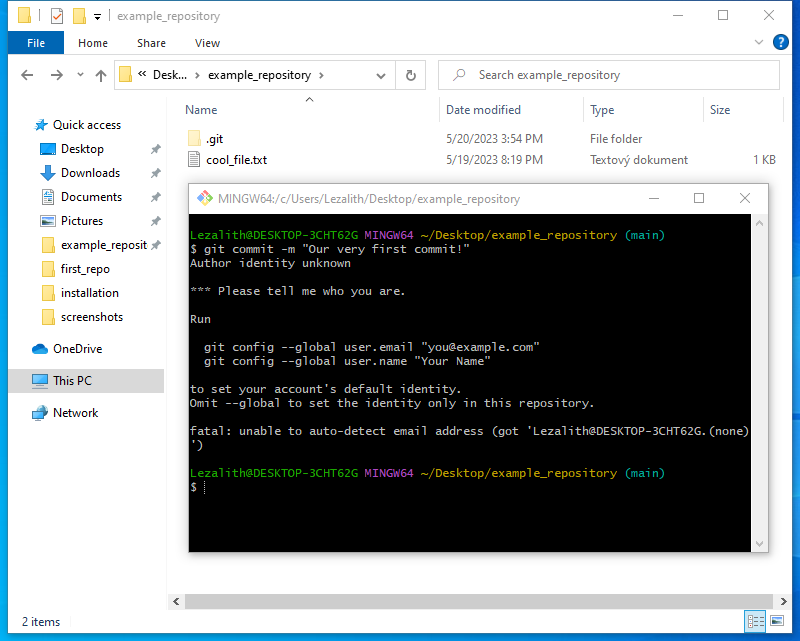
It is very tame compared to what we'll have to deal with when setting up GitHub. This right here just asks for very basic settings, since commits always record their author - naturally, a key feature in collaborations.
What's very nice is that it tells us straight away the two commands that we need to run to set the necessary settings. Less nice is that the commands don't give you a confirmation that they were run successfully, but we'll take their word for it.
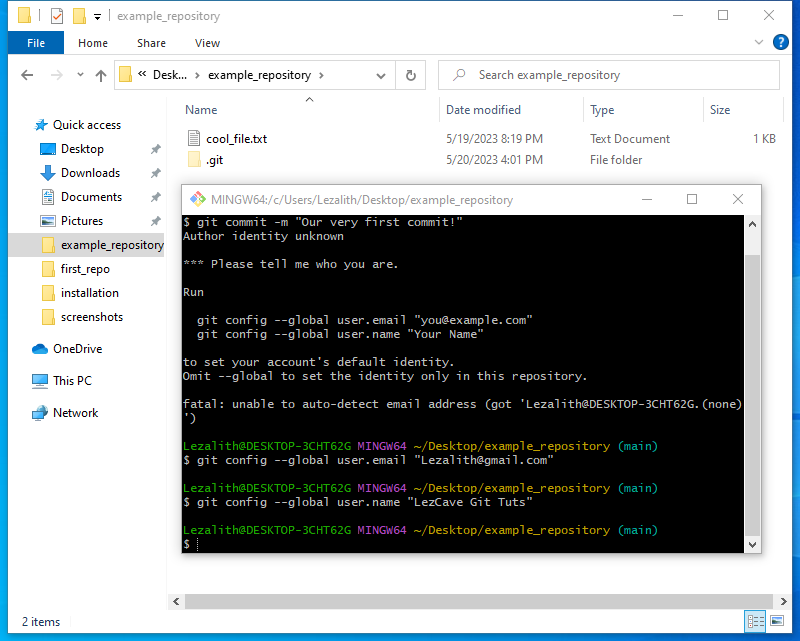
And with that configuration done, we're finally able to create our very first commit.
As already mentioned, commits are created with the git commit command. You should always use the -m argument to include a message representing the commit - something short and descriptive.
My command was a simple:
git commit -m "Our very first commit!"
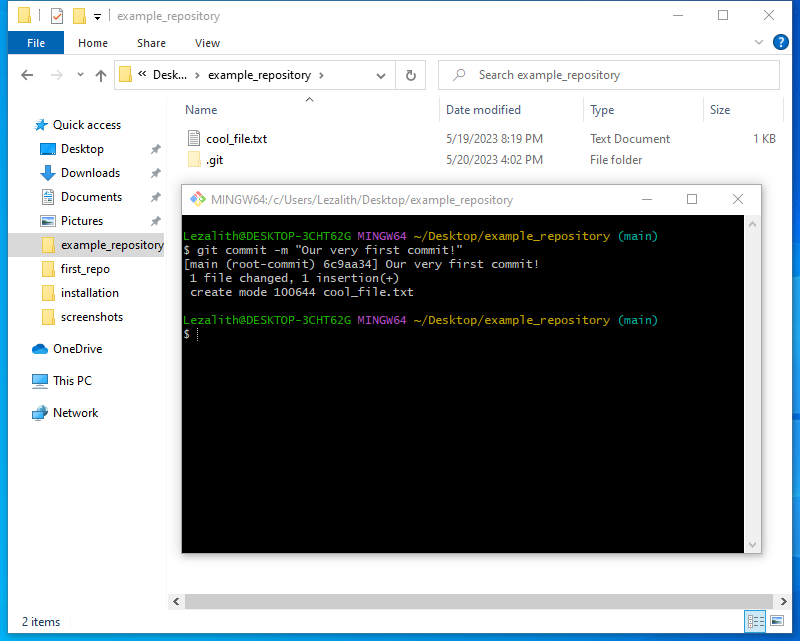
The process of creating a commit gets printed out, finished by the summary of how many files were changed, how many lines inserted and how many deleted.
And just like that, you've created your first checkpoint. Now you really have a reason to celebrate.
But I don't. Lez from the future here! It wasn't until I was done with writing Git Part #2 that I realized I ended this tutorial on one commit, but Part #2 starts out with having two. And for some reason, I didn't screenshot creating the second commit...
Oh well. Part #2 has me re-creating that commit, so I'll use that image instead, and photoshop in the correct commit message.
I just need to grab a screenshot of the second file, I didn't get that either...
Be right back.
(2 minutes later...)
...Oh.
...That's right. I deleted the file at the very end of Part #2. Christ, fine, I'll create it again...
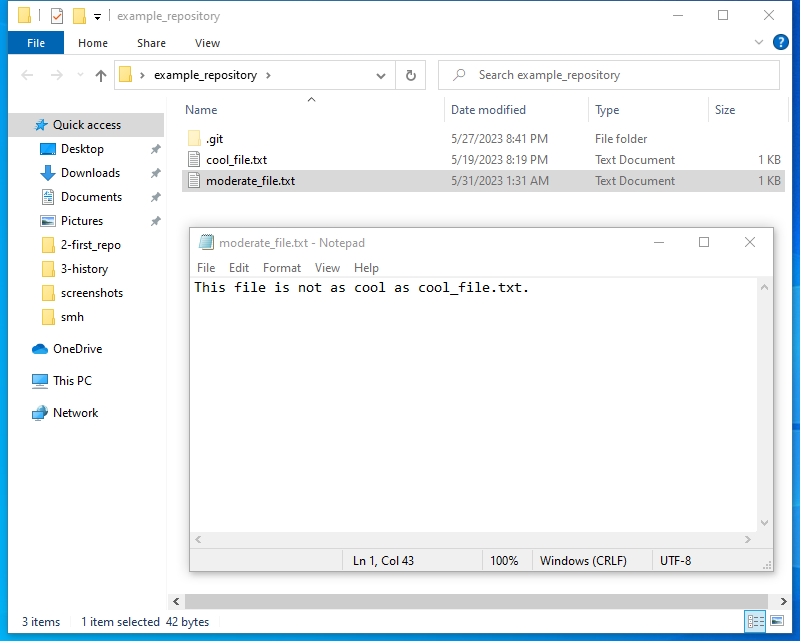
Let's go for just one more commit. I've create another file, moderate_file.txt, which we can track next.
Here's the complete process. See if you remember it!
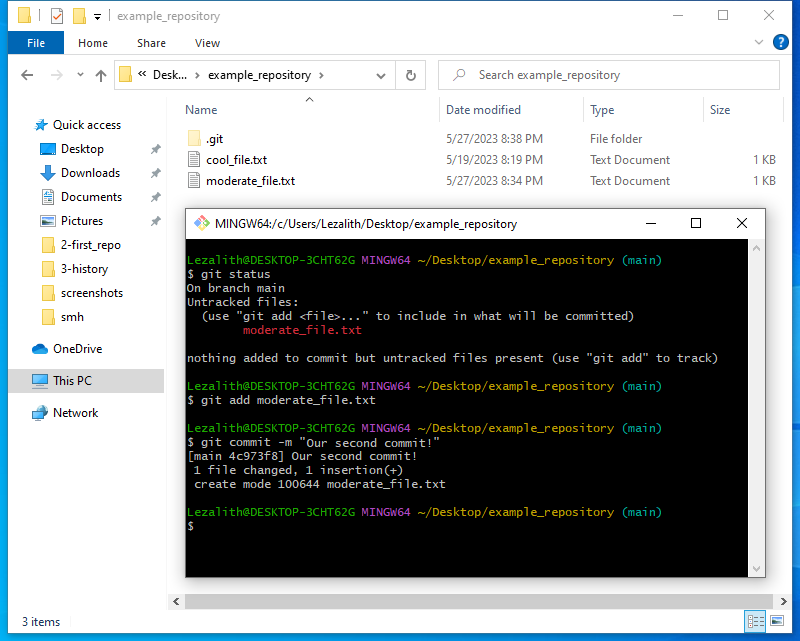
- First, the almighty git status to show the current state of the repository
- Followed by git add to have the repository start tracking the new file
- Finished by git commit to create "Our second commit!"
And this is the point where you realize that working with Git really isn't that hard, and more people could definitely benefit from using it for their projects.
Time for the usual summary, even though the last image summarized a lot already. Today, we have gone over:
- How to open Git Bash in a folder
- What a repository is and how to initialize an empty one
- Making a repository track a file with the add command
- Printing out the repository's state with git status
- Setting some very basic config variables
- How to create commits
In the next tutorial, we will work with the history of commits - going back and forth between them to see what the project looked like at different points in time, and deleting commits to revert your changes.
As always, thank you for reading these, and I hope to see you at the next one.