
Git Tutorial #2
Working with History: log, checkout and reset
In Part #1, we've created our first two commits. Given how I've praised the option of being able to move across the created timeline, in this tutorial, we're going to learn how to do just that.
But to interact with the history, we first need to see what it looks like. We have our bash open inside the repository folder, all we need to do is type in the log command.
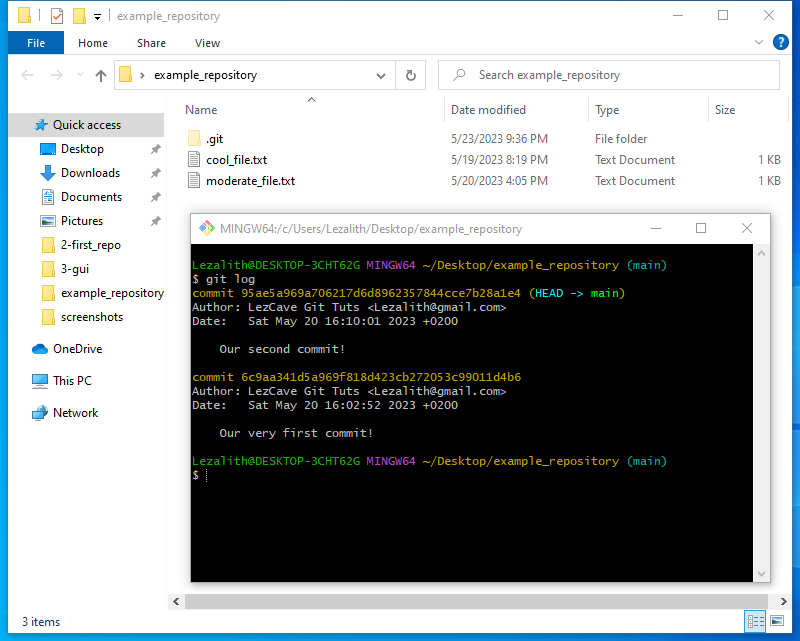
There it is. The log command prints out the entire history, showing all of the commits created up until now, sorted newest to oldest.
If the history was too long for the console window, it would become scrollable. Anytime you're in a scrollable mode in this bash, you can exit it by pressing Q. If you chose the default windows terminal during installation, Ctrl + C should do the trick - a shortcut commonly used in consoles to stop executing commands.
Every entry consists of few pieces of data:
- ID of the commit
- Author, as recorded in the user config variables
- Precise time of the commit's creation
- Message attached to the commit
- ...and a couple more not printed by default
The ID specifically is very important. It's the long bunch of illegible symbols (called hash) on the first line. Author and creation time follow on second and third lines respectively, and finally the commit's message.
Take note of the (HEAD -> main) behind the newest commit's hash, it will be explained later.
Because of the way hashes work, each of them is guaranteed to be unique. As such, we can always use the IDs to reference a specific commit.
For what we're about to do next, we're going to need the hash of the first created commit - the OG "Our very first commit!". In this bash terminal, I can select it and right-click to copy it like I usually would. Not Ctrl + C!! Bashes do not usually use it for copying.
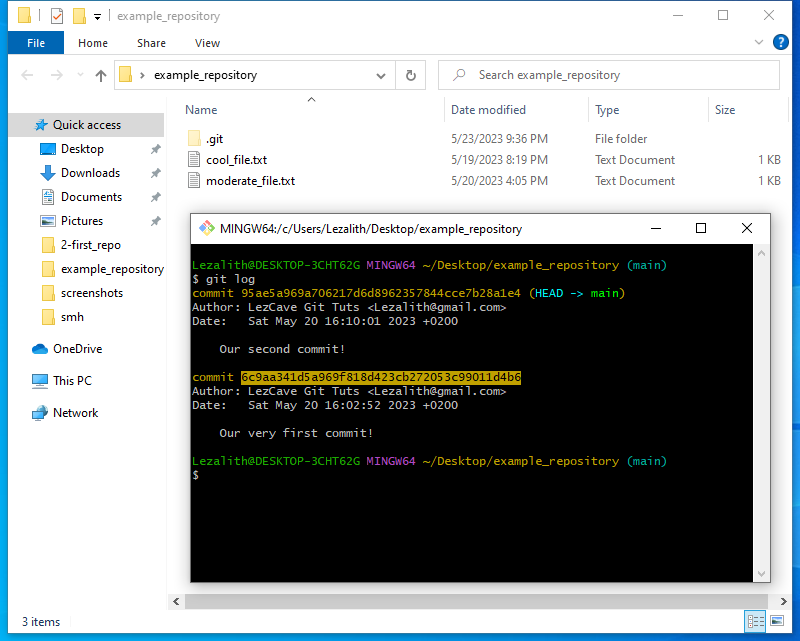
Let's say that we want to see what our project looked like at one point. Since we already have the ID of our first commit copied, we don't have to leave this at a hypothetical: Moving to this commit will change the project's state to what it was when that commit was created.
And how do we move between commits? The simplest way is the checkout command, only followed by a commit's hash.
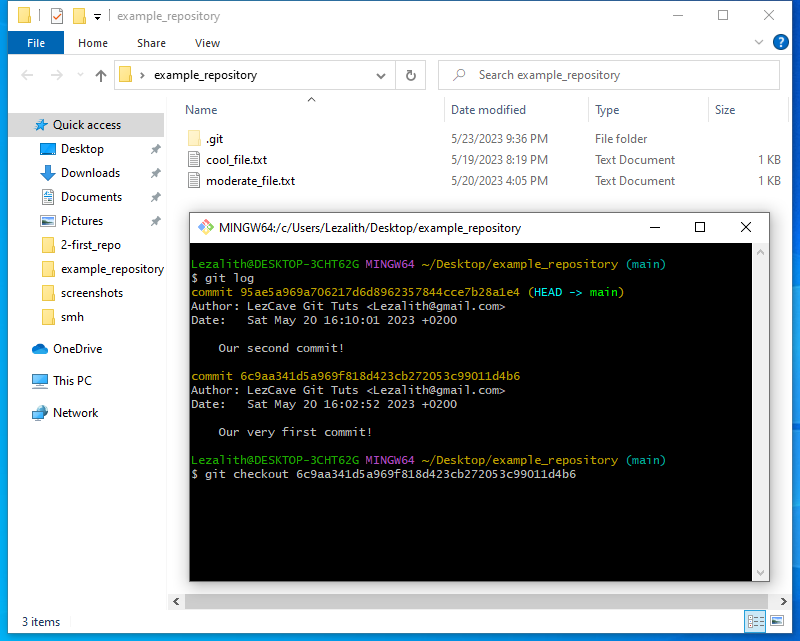
Typed in like so, a lot of text will come back if we confirm the command. Skip reading the essay for now.
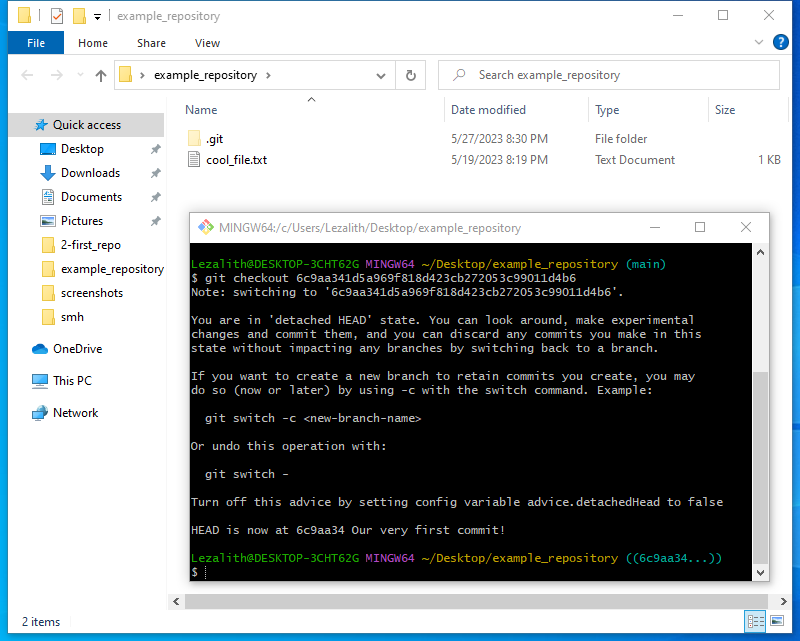
Focus on the important bit: moderate_file.txt is gone. Tadá! We made a file disappear. Why is the file gone? Because when "Our very first commit!" was created, there was just cool_file.txt on its own.
Going back to what the terminal says, we will try to decrypt the message, but to be able to do that, we will have to understand some more theory, first.
First, a swift reminder on branches: Every commit in a repository belongs onto a branch. If you haven't created one yourself, there will only be the initial branch, called main or master.
The branch we're currently on is shown in cyan color inside the terminal - it was (main) when we input the checkout command, and now it says ((6c9aa34...)) instead: While the symbols are of course the beginning of the commit's hash, the parentheses tell us that we're inside a commit, not a branch.
Next, HEAD. HEAD is, very simply put, a representation of where we're currently active inside the repository. That's what the (HEAD -> main) behind the newest commit in git log meant: While usually we'd find only (main) in that spot, indicating that that commit is the newest in that particular branch, (HEAD -> main) shows it's also where we are (or were) active.
And with that, we can understand detached HEAD, which is what the whole printed warning talks about. It is what you call when HEAD points to a commit that isn't at the end of a branch, and it puts us in a limbo-like state, where anything we do is isolated and not kept permanently - unless we create a new branch from here, for example with the mentioned git switch command.
All of this is bound to make more sense in Part #4, which will be entirely focused on branches. The message has more of an informational character, and it can be turned off with git config, the same way we've set the User and Email variables last tutorial:
git config --global advice.detachedHead false
With that variable set, git checkout from the main branch onto a commit would look a whole lot simpler, printing only a confirmation of where the HEAD now points to:

By now, we should understand every single line shown in this image.
Say we're done reviewing the past version of our project, we're not interested in creating a new branch, what do we do to go back to the present? We can just checkout again, with the main branch as the target:
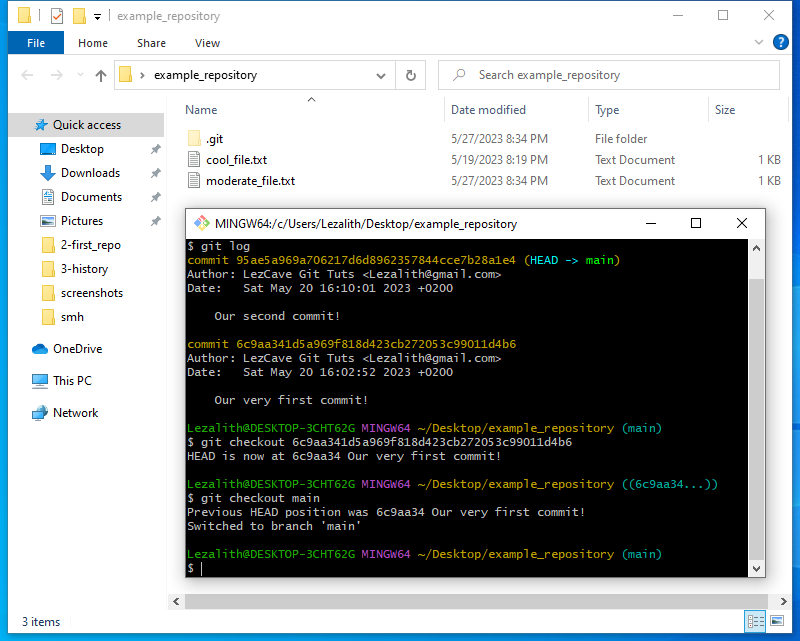
We will get a confirmation in the form of two lines, telling us where HEAD was pointing prior to the command, and where we have switched to.
Now that we're back, moderate_file.txt has returned from the void, alive and well.
Let's talk about the reset command. git reset is a way for us to go back in time permanently, removing created commits. It is used in the same way as checkout: the command followed by a hash of the commit in question.
We'll use the first commit's hash once again, prompting Git to delete all commits prior to it (just one in our case, "Our second commit!"). First, let me run git log once more and prepare the reset command...
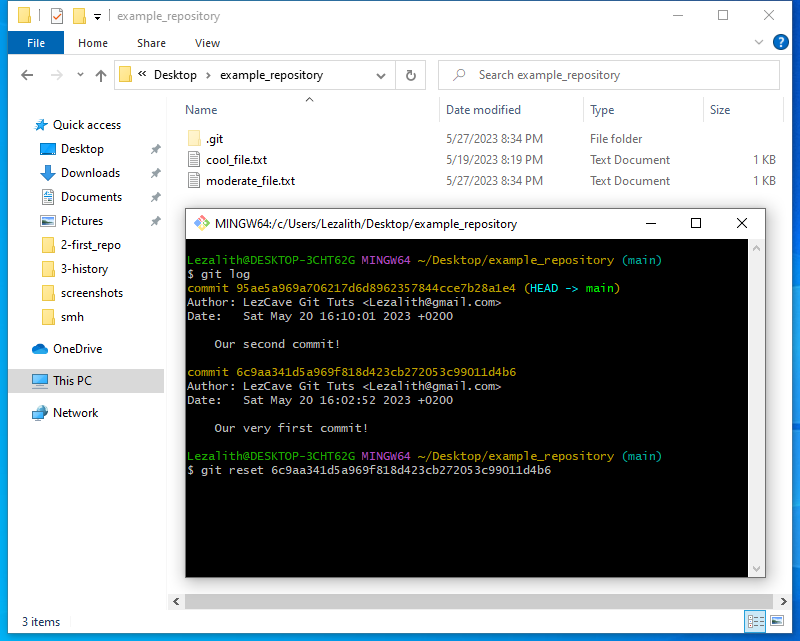
Now, I'll run the command and continue with a second git log. I've selected the first one, so we can more easily tell them apart.
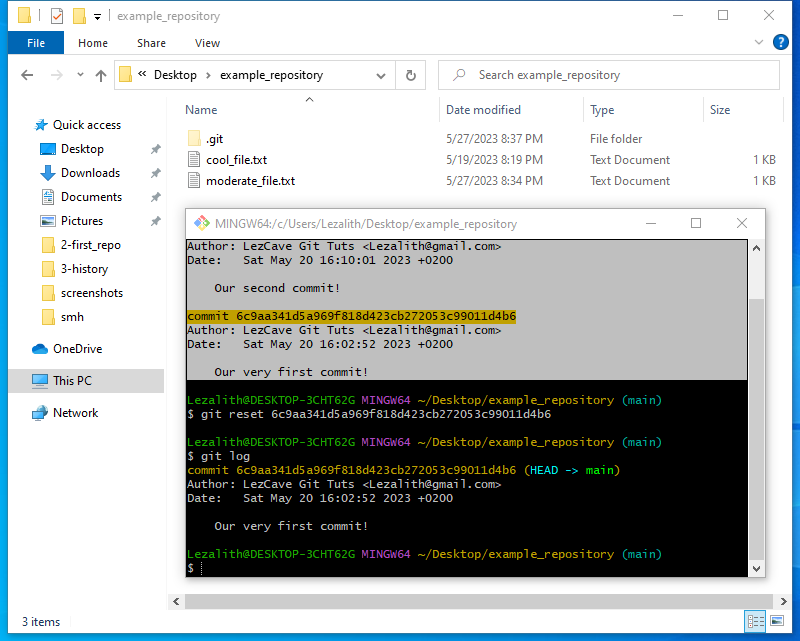
As you can see, "Our second commit!" is gone, deleted from history.
If you take a closer look however, you will see that moderate_file.txt is still present. If the commit is gone, shouldn't the file be as well?
There are different types (or modes) of resets. The default one is mixed, which resets the history but doesn't touch the files, leaving the reverted changes unstaged and files untracked.
The mode that resets both history and files is called hard, and is the last thing I'll show you in this tutorial.
And for completion, there's also soft mode, which I don't think I've ever used - it seems eerily similar to checkout.
To show you the hard reset, I'll first need to re-create the second commit, since right now we don't really have anywhere to reset to. Let me go ahead and do that now...
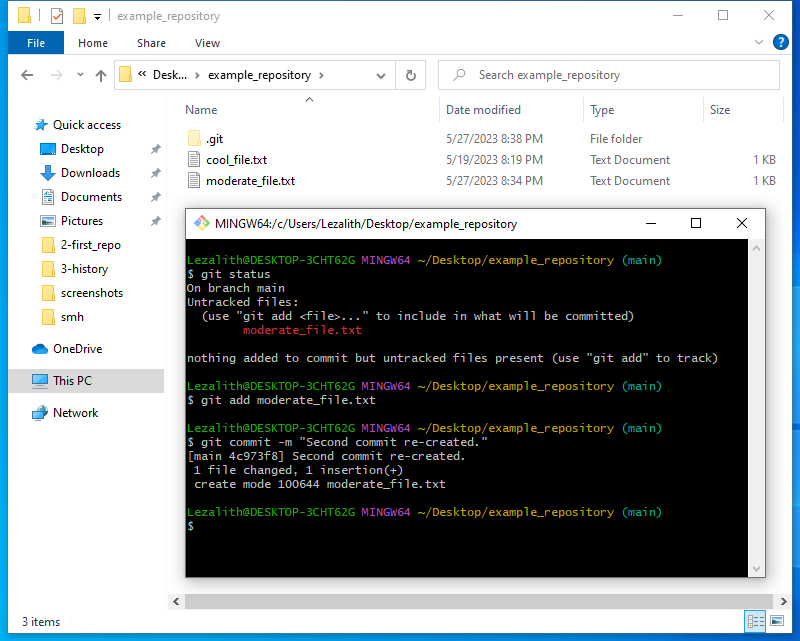
Process pretty much identical to the ending of Part #1:
- git status to see the current state of the repository
- git add to track moderate_file.txt
- git commit with the usual -m argument to include a commit message
And with that, I can git log one last time to get the hash of "Our very first commit!" again, and reset to it with the --hard argument.
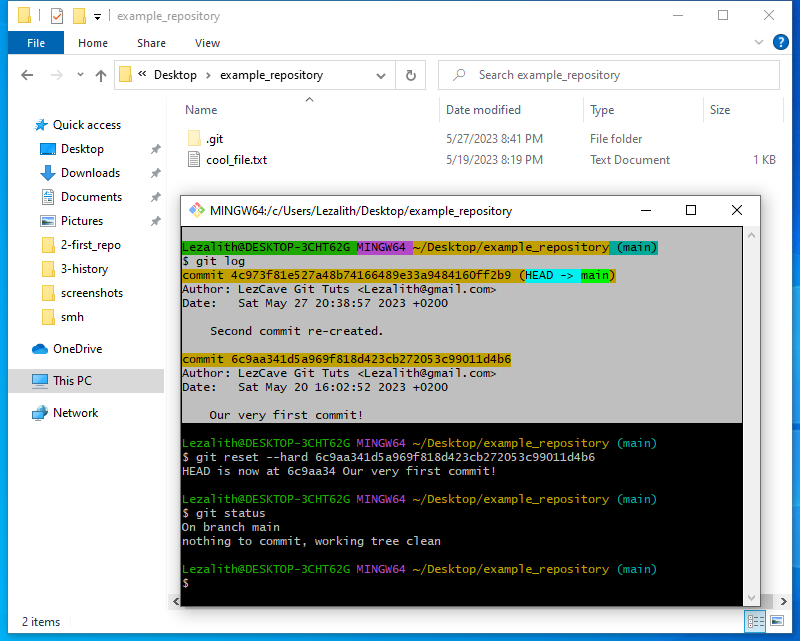
And that's going to be it for this one. As per usual, we'll be ending our tutorial with a summary. Today, we have gone over:
- Printing out the history of commits with git log
- Moving to past versions of the project and back with git checkout
- Terms like branches, HEAD and detached HEAD
- Deleting commits with git reset to revert your changes
As mentioned, branches await us in Part #4. To better understand them, we'll be switching to a GUI program in Part #3, meaning no more Bash - while this will please most of you, I hope I've shown you that working inside terminals can be easy and not intimidating like it appears to be.