
Git Tutorial #3
GUI Program and Branches
In this tutorial, we'll be diving into something beyond exciting. GUI!
GUI, which stands for Graphical User Interface, is a fancy abbreviation representing programs - those with windows, tabs and buttons, unlike the Bash terminal. And now that we've gone over multiple terms throughout our time spent in Bash, we will have no problem orientating ourselves inside GUI programs.
Git itself does have a default GUI program simply called Git GUI, which is very... barebones, to say the least. I've heard the advice of my friend and tried out GitHub Desktop.
And I gotta say, I am beyond impressed. It is incredibly easy to work with, and I think I'll be using it myself from now on.
It will be the perfect place to continue our Git learning process: Today, we will finally focus on branches, and in the next tutorial, we will be learning about GitHub alone.
Before we get into the tutorial, we have to download GitHub Desktop. Here is the link to the download page, where you can grab the installation file - looks like it automatically detects your operating system.

I was worried I'd have to do another installation tutorial, but fortunately, GitHub Desktop asks for literally nothing and installs itself without needing your input.
This has the downside that you seemingly can't choose the installation folder, and you might need (like I have) to Launch the installation as an Administrator, to let it create the files where it wants to.
The installation window is super pretty though. You can't see it here, but the stars sparkle.

When the installation is done, GitHub desktop will open automatically on the intro page and give you the option to sign in to GitHub.
Also, I think it's time I started abbreviating GitHub Desktop to GHD from now on.

We will Skip this step for now and come back to it in the next tutorial.
Next, we need to set the Name and Email for info in commits. Since we've set the global variables in Part #1, GHD loads them in automatically, but still gives you the option to change it. Very nice.
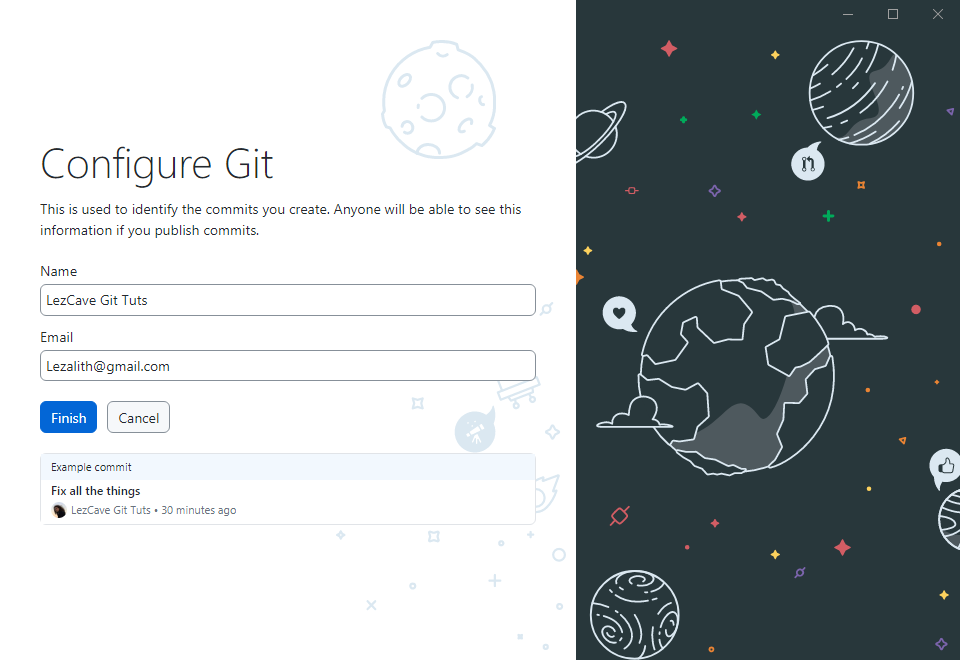
And that's the setup done. We will now be brought to the starting page, where we can open a repository and start working with it.
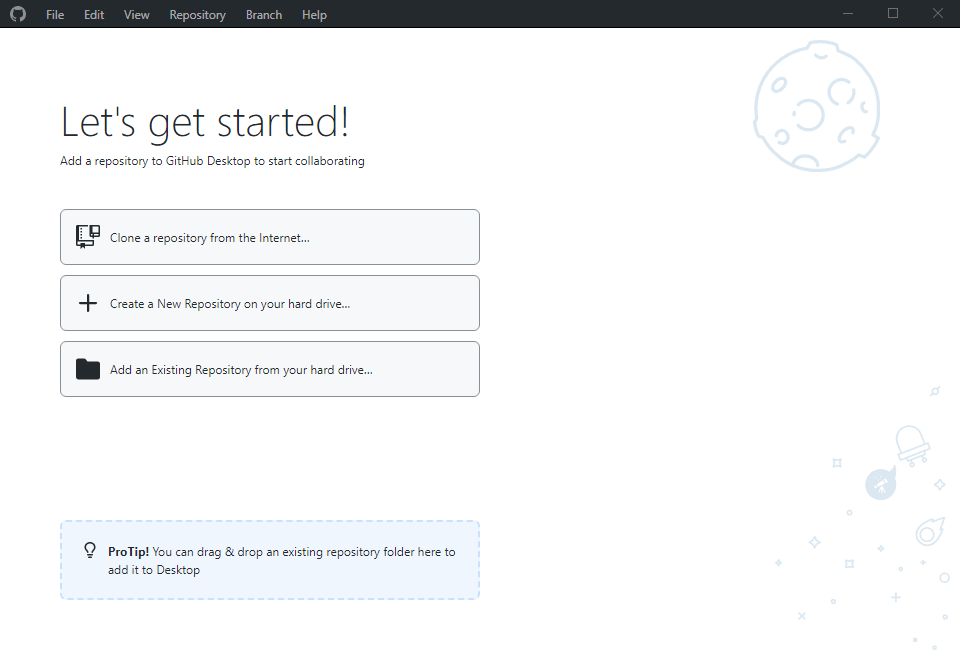
If you want to follow the Pro Tip, you can drag & drop our example_repository folder (or any folder containing .git) into the window.
If you instead want to click the Add an Existing Repository button like I have, choose the path to the repo folder and click the blue button.
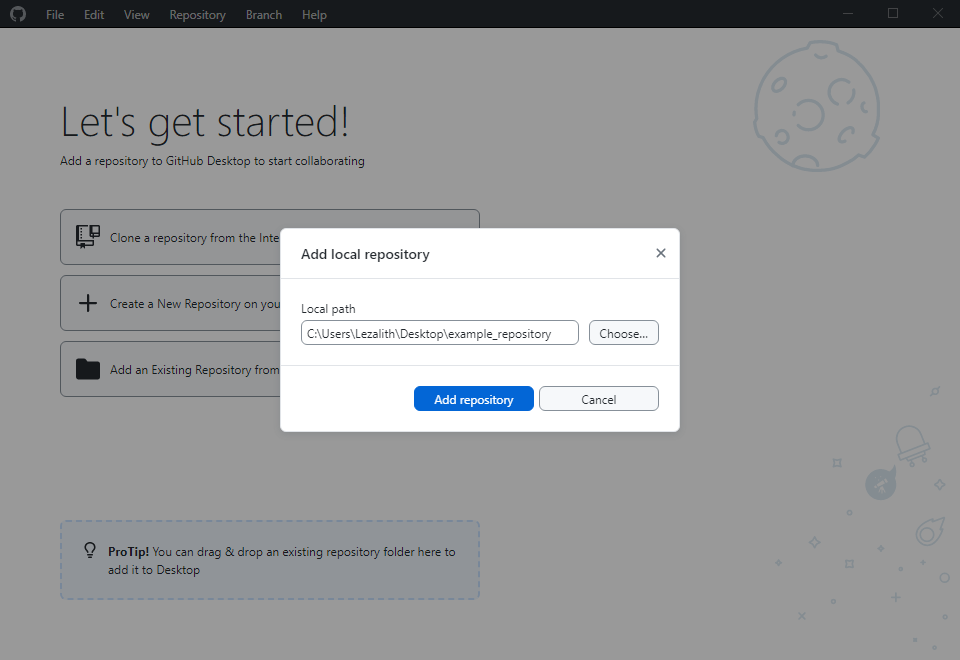
And when you do, it will lead us to the Main Page of the repository.
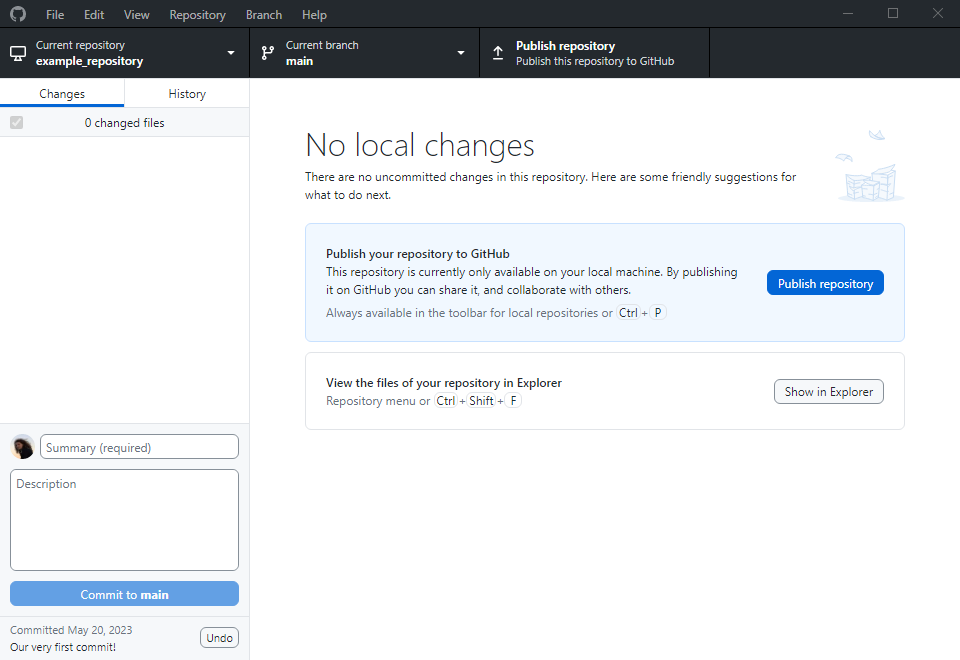
Let's stop here for a moment. As we will be spending a lot of time on this screen, I would like us to perfectly understand where everything is located.
First, the three big buttons on top. Current repository is our operating folder, Current branch is the branch we're currently on (right now the default main), and Publish repository is a push/pull action - a topic for Part #4.
Left side is dedicated to creating commits. Under the Changes tab is where you can stage and unstage files - to remind you, staged files are included in the next created commit.
There's a window prepared for the commit messages (the required Summary is what we input in Bash with the -m argument), a blue button that creates a commit (mentioning the branch we're committing to), and a mention of the latest commit in case you want to quickly undo it.
Finally, the main window on the right side that currently reads No local changes is where we see the changes done to files. Let's see how that works next.
I've done two changes to our files:
- cool_file.txt got deleted, after accompanying us for two tutorials
- A new file called original_file.txt with one line of text got created.
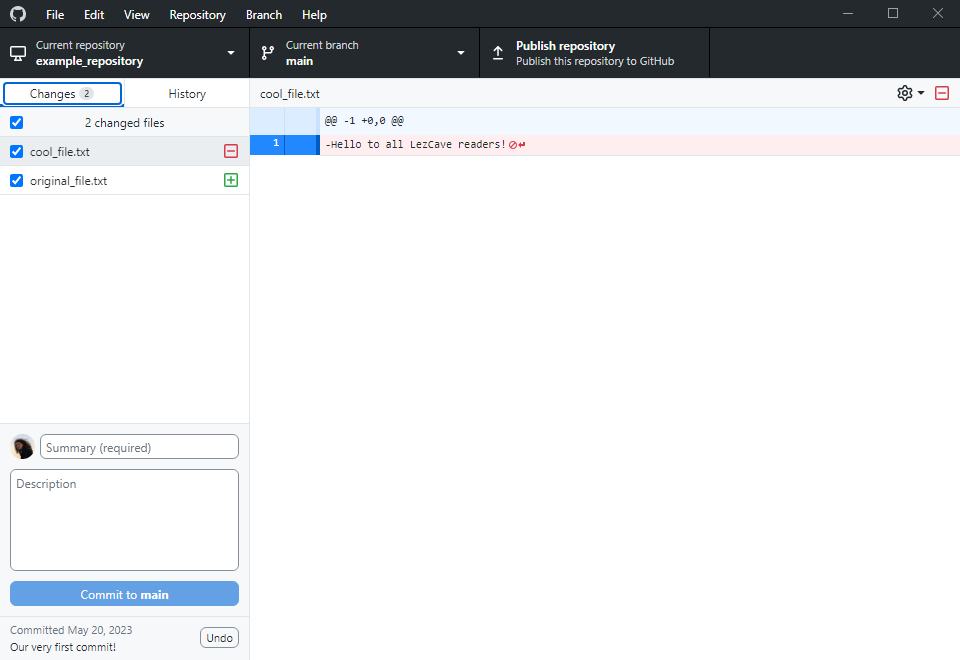
Inside GHD, the main window has changed, showing an overview of the selected changed file from the left list.
For cool_file.txt, red color marks removed content:
While green color marks created content:
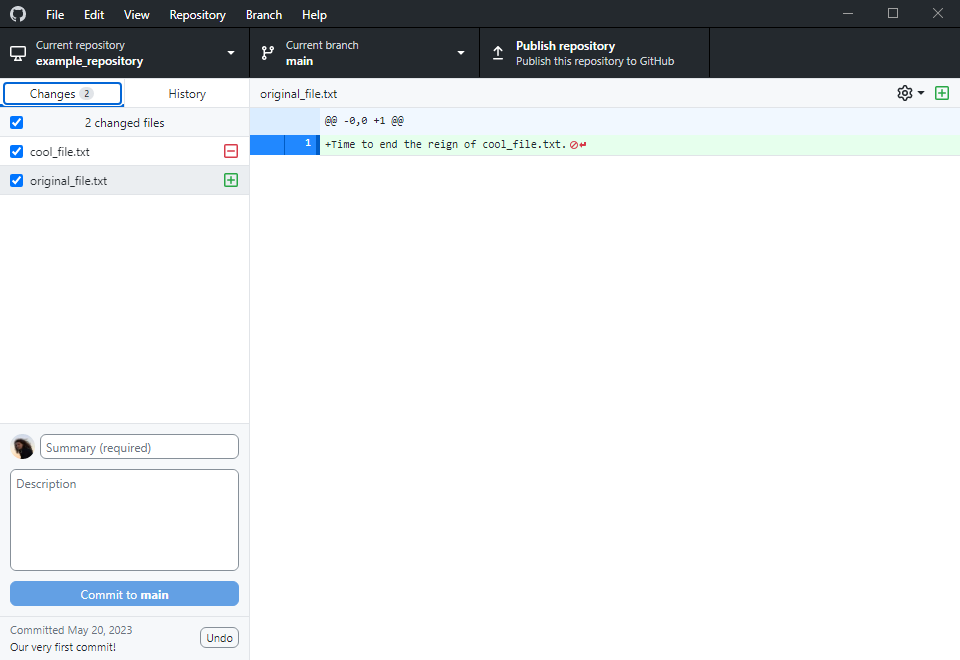
Changes are staged by ticking the blue box left to their name. Using a GUI also lets you very easily stage only specific lines, a notable difference from the Bash commands (where it is hard, although still possible).
TODO: Lookup how that is done?
I've already mentioned the bottom section for creating a commit. If I just fill in the message like so...

I can click Commit to main, which will create the commit and lead us back to the Main Page of the repo.
Let's see the second major tab, History. It is like the git log command in Bash, but significantly prettier.
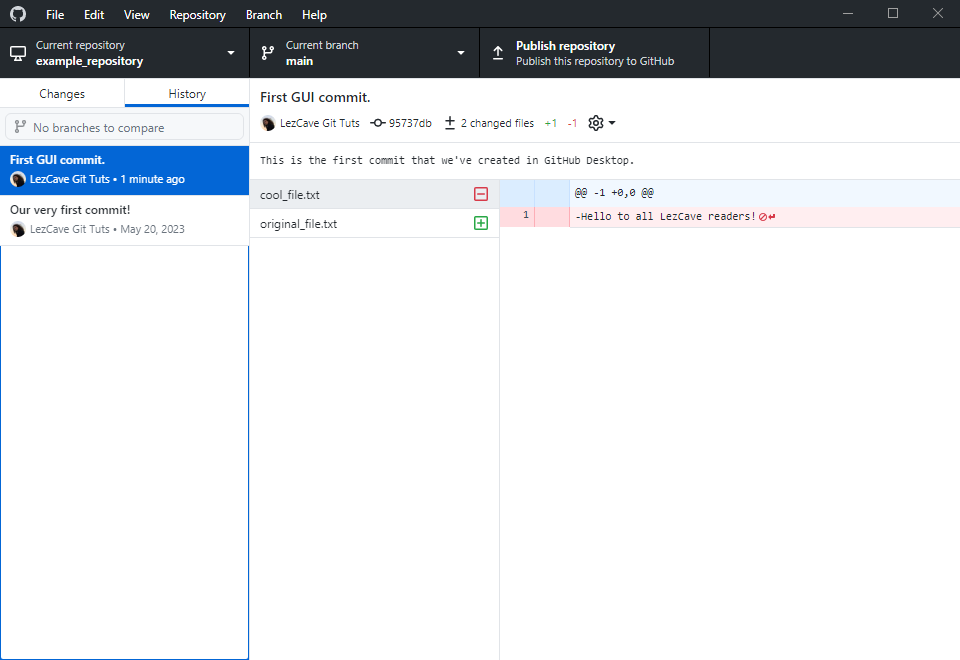
The commits are sorted newest to oldest, with the one we've just created on top. The main window shows details about how many files were changed, what changed, the commit hash and so on.
And that would about do it for the overview of the program.
Okay, branches! They've been mentioned so many times by now, and we're finally about to dive deep into the topic. Do not worry, they're not as scary as they might sound.
In fact, I think I can skip the theory for now and show you what they do in practice. They are used to isolate changes from the main branch, and to demonstrate, we'll need a new branch, which can be created under the Current branch top tab.
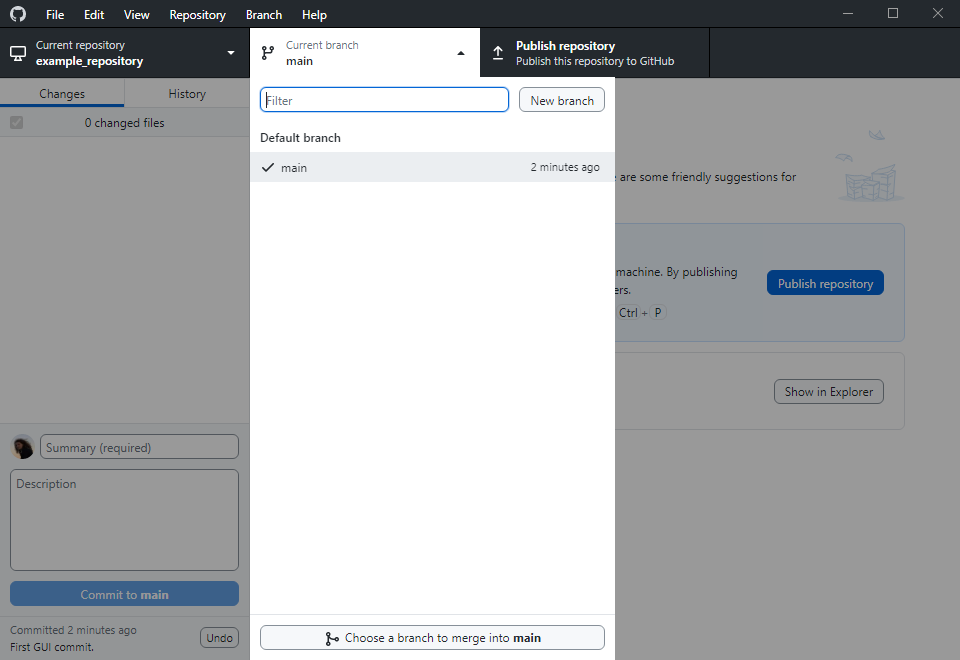
Simply click the New branch button, which will prompt you to input the new branch's name and notify you where the branch is created from. Branches do not start from scratch, they continue from a point in another branch. For us, this point is "First GUI Commit." on the main branch.
With a new branch which I've called sidebranch created, GHD switches to it automatically, putting its name as Current branch. New branches do not typically have any changes, so we're once again left with the No local changes message.
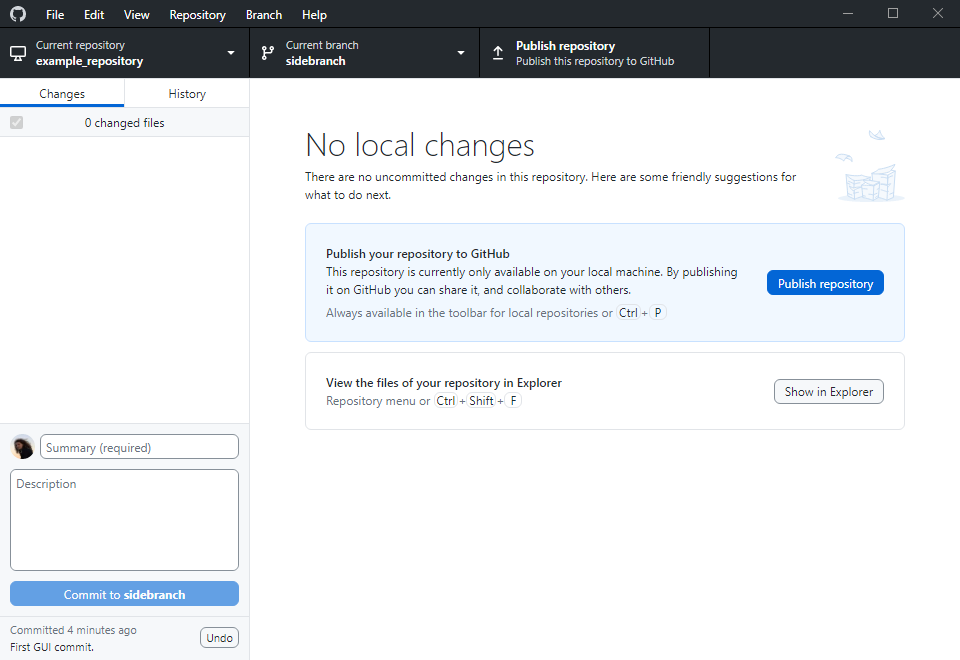
Let's change that. I've created a new text file yet again, this time called branch_file.txt. It will be essential to our demonstration.
With the file ticked to be staged, we can create a new commit like we normally would. Notice how the blue button now reads Commit to sidebranch.

And with that, here is what example_repository currently looks like.
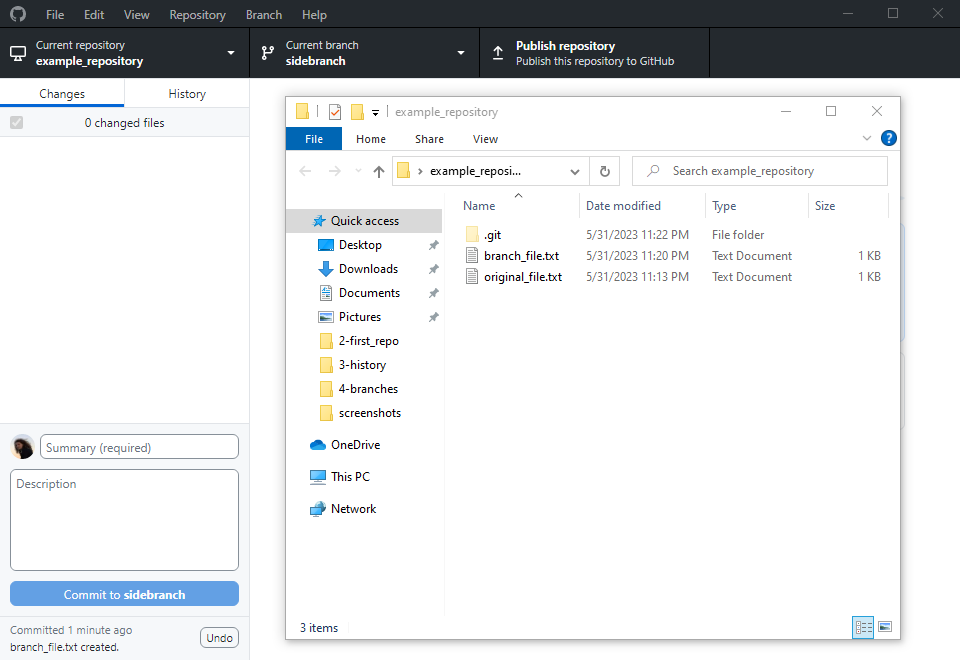
Here is the point where we finally get to see what branches are used for. After clicking on the Current branch tab once more and selecting main as our branch, branch_file.txt is gone.
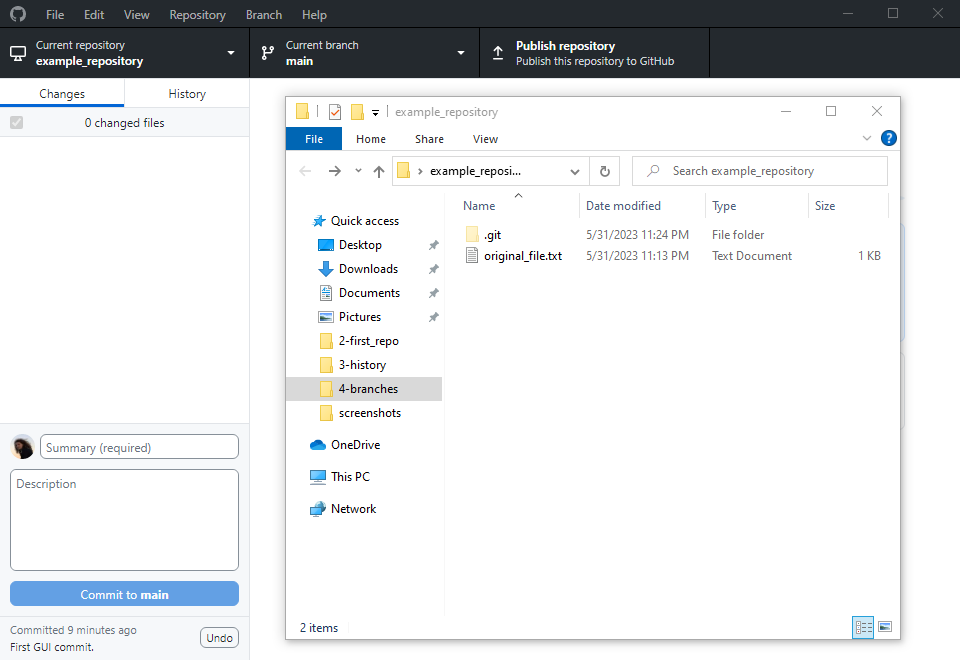
Why? Because repository has the state according to the branch we're on. Hopefully that's understandable.
Let's say that we've successfully developed a feature in a different branch, and we would like to insert it into the main workspace, the main branch. Enter merging.
Merging is the process of moving changes of one branch into a different branch. This is commonly done using a merge commit, a commit that looks like any other and simply records the changes caused by the merging process.
To start, we once again follow the Current branch tab, and Choose a branch to merge into main.
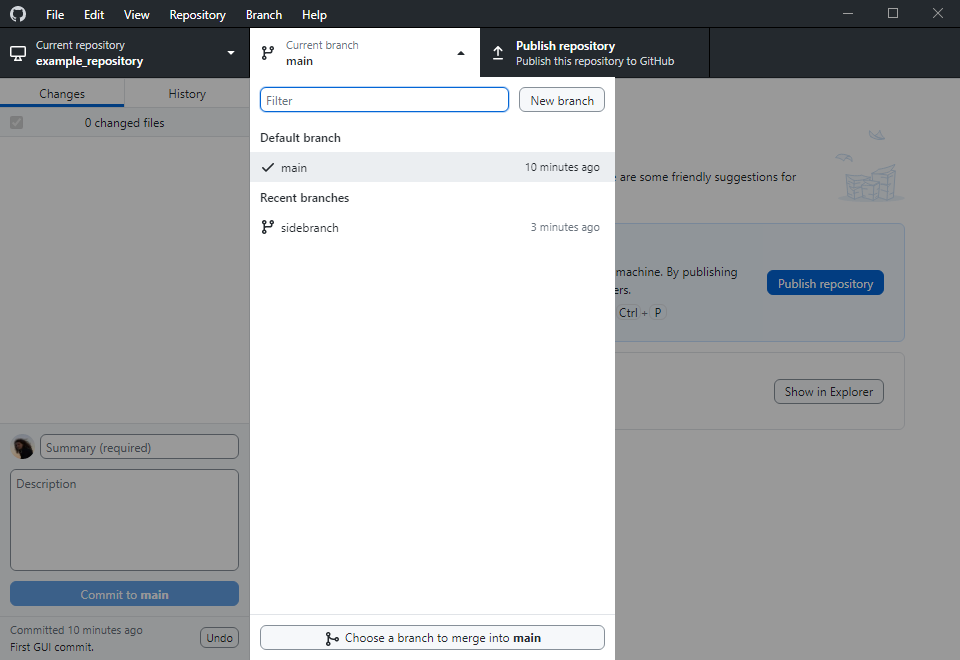
We select sidebranch. Bottom notification shows that this merge will consist of just one commit, that being "branch_file.txt created.".
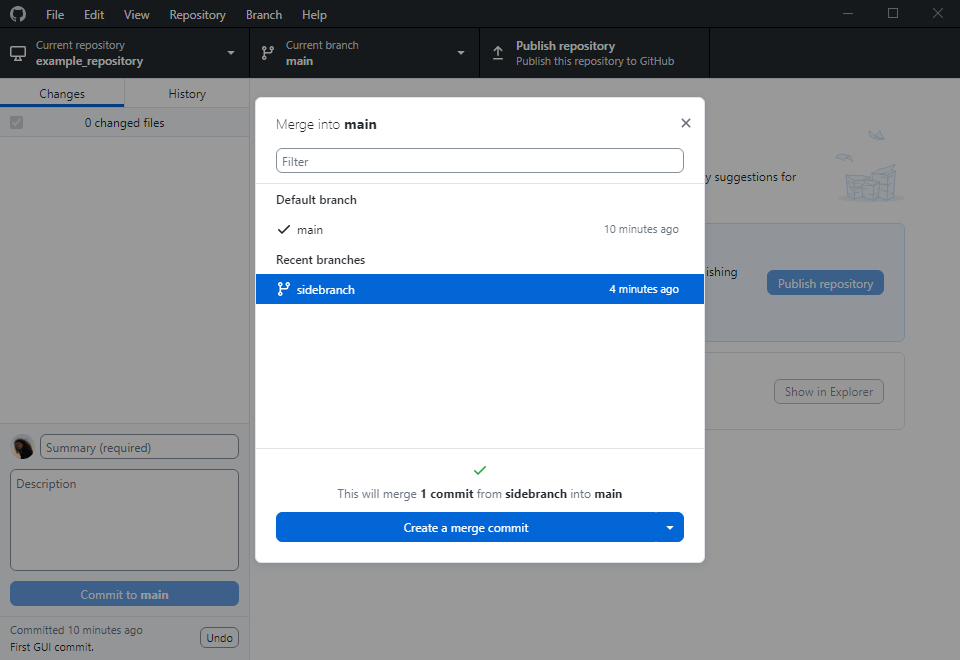
And that's it, the branches have been merged - it shows a confirmation message that reads "Successfully merged sidebranch into main" that I've been too slow to screengrab, but don't worry, we'll have one more chance to see it (spoiler, I was prepared that time).
Both branches now point to the same commit. If we change sidebranch further and try to merge it again, the merge will happen from here, not the commit from which the branch was created, meaning the "branch_file.txt created." commit (which has been merged in already) will not be part of that merge.
If we take a look inside the folder, we will now find branch_file.txt present, and in the background in GHD, the updated History tab can be seen.
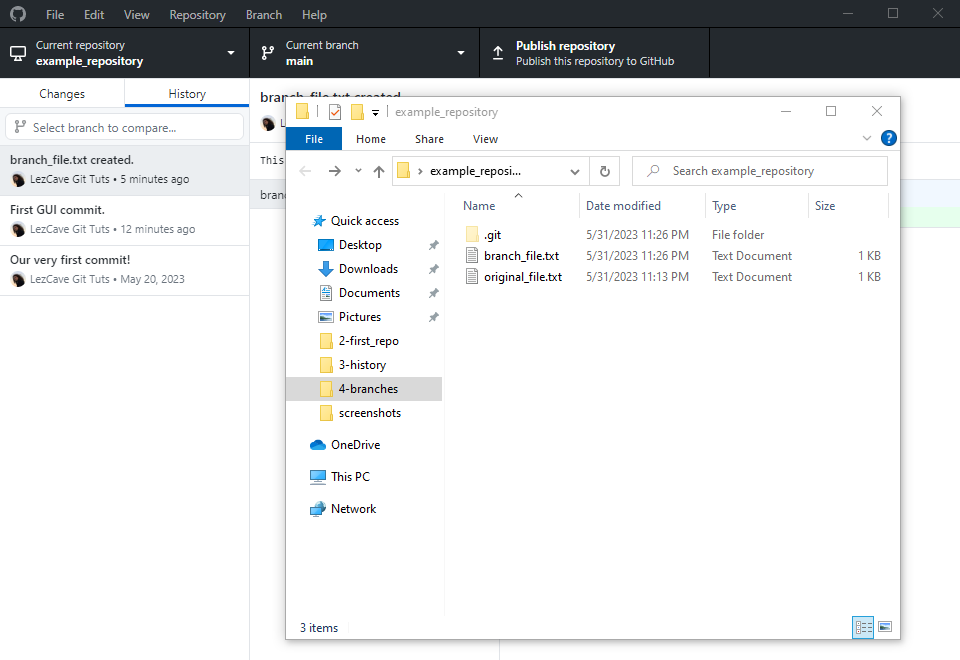
You might've noticed that there isn't actually any merge commit in the history, just the "branch_file.txt created." commit from sidebranch. Surprised me too - I thought a merge commit would always be created this way, but it's not.
However, I'm sure it's not created because the changes are compatible. In other words, there are no conflicts that we'd have to solve.
Merge conflicts happen when the changes being merged are incompatible. This occurs when a file is changed in both branches, and Git is unable to decide what should be included in the final merged version - the version from the original branch, the version from the merged branch, or some combination of both.
We will now intentionally get into a situation like this, so I can show you what merge conflicts look like and how to solve them. Let's start off by creating another branch, fittingly named anotherbranch.

Here is the window that prompts you for the branch name! I described it when creating sidebranch, but haven't shown an image.
With anotherbranch created and automatically switched to, I will now modify branch_file.txt and commit it. New text mentions that the change was done inside this branch, and commit holds the message of "Change in anotherbranch."
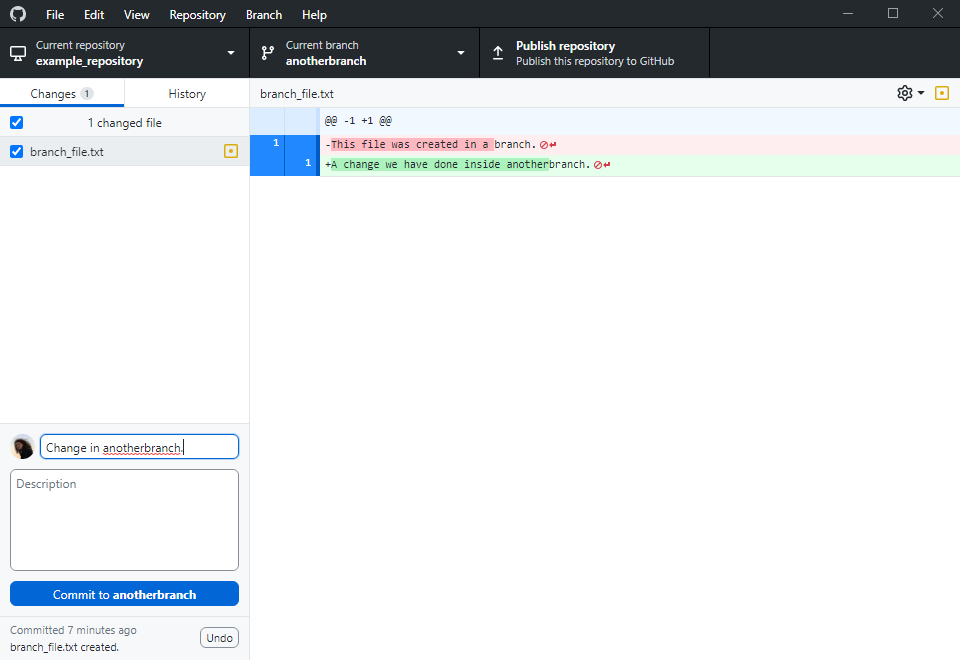
Back in the main branch, I will now open branch_file.txt yet again. In the main branch it still has the original message, and I will modify it here to also refer the name of the current branch.
And commit it, of course. "Change in main." is the message.

We now go ahead and try to execute a merge of anotherbranch into main. However this time, there is not a green tick at the bottom, but a warning exclamation point.
It mentions 1 conflicted file, and we will have to solve this conflict through a merge commit to be able to finish the merge.
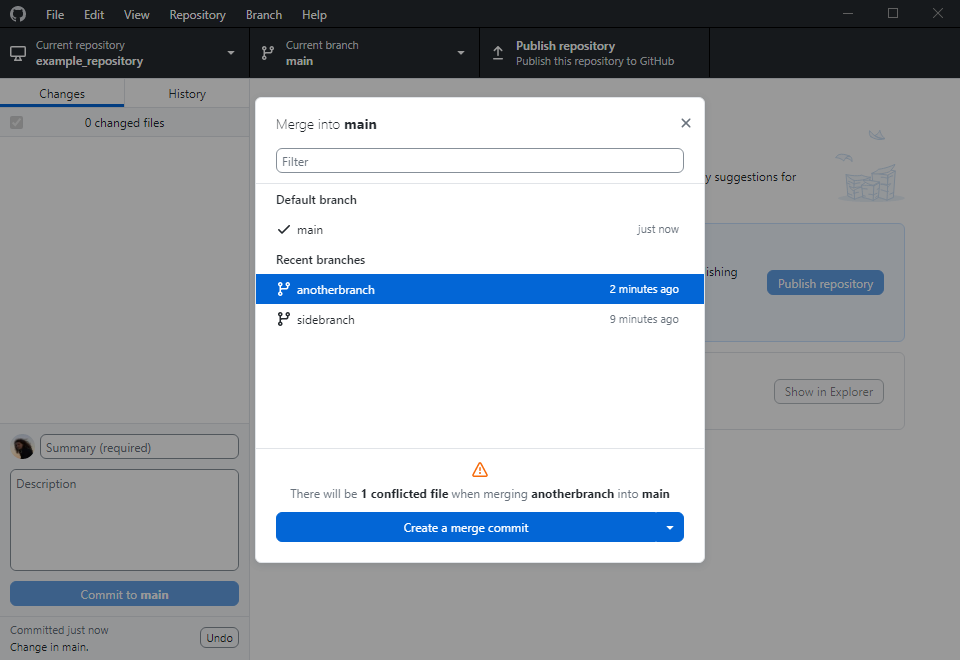
When we click the blue button, we will be presented with a window that shows all the conflicted files.
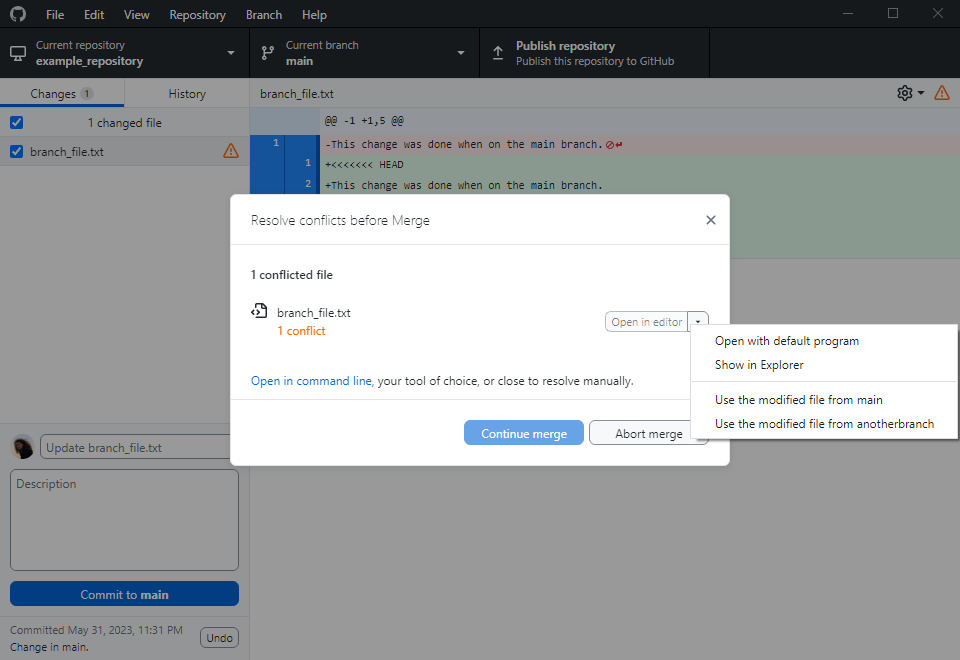
There are multiple options available to us to solve conflicts, already mentioned earlier on. The default Open in editor option isn't available to us, because a default editor has to be set in GHD's Options under Advanced, which I haven't done. So, what about other options?
The straightforward ones are Use the modified file from branch, which will simply keep the version of the file in the selected branch. If we chose from main, branch_file.txt will contain the "This change was done when on the main branch" line after the merge. If from anotherbranch, the file will have the "A change we have done on anotherbranch." line.
If we want to customize the merge, for example if we want to keep both changes, we will have to specify it through the Open with default program option, basically the equivalent of Open in editor.
This will open a temporary version of the file, which we can modify to determine what we want the result to look like. Here's how the file looks when it opens:
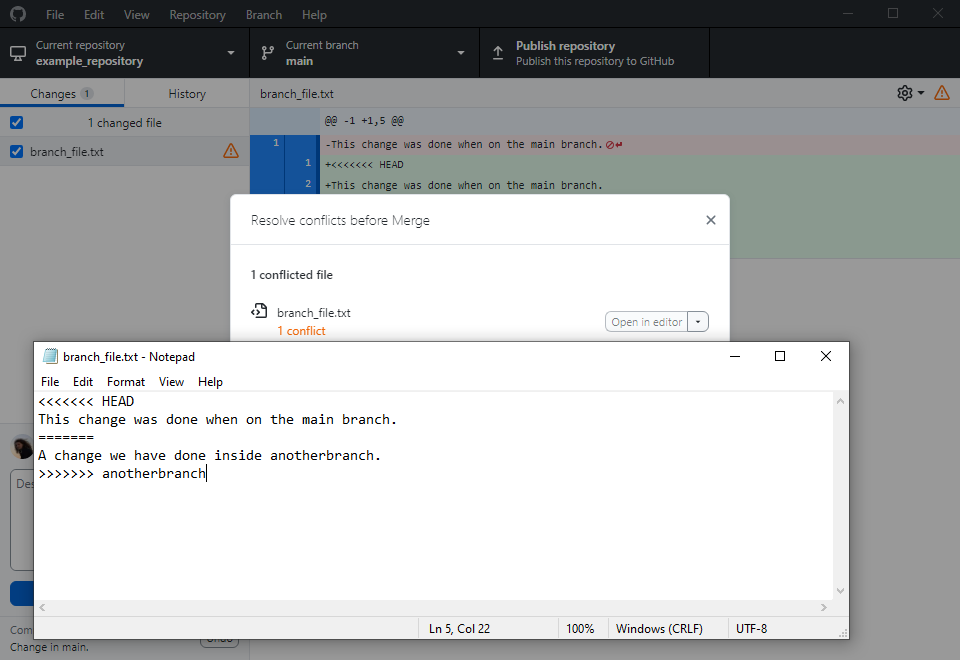
Here, every changed segment of the file will be highlighted, starting with <<<<<<< HEAD (where HEAD represents the branch we're merging into) and ending with >>>>>>> anotherbranch (or any other name of the branch being merged.
The segment is split by a ======= dividing line. Area between HEAD and the dividing line shows what the changes look line in the branch being merged. Area between the dividing line and the [branch name] shows the changes in [branch name]'s version of the file.
To solve the merge, we have to replace every segment with what we want the result to be. I want to keep both lines of text, so I'll edit it as such, and save the file.
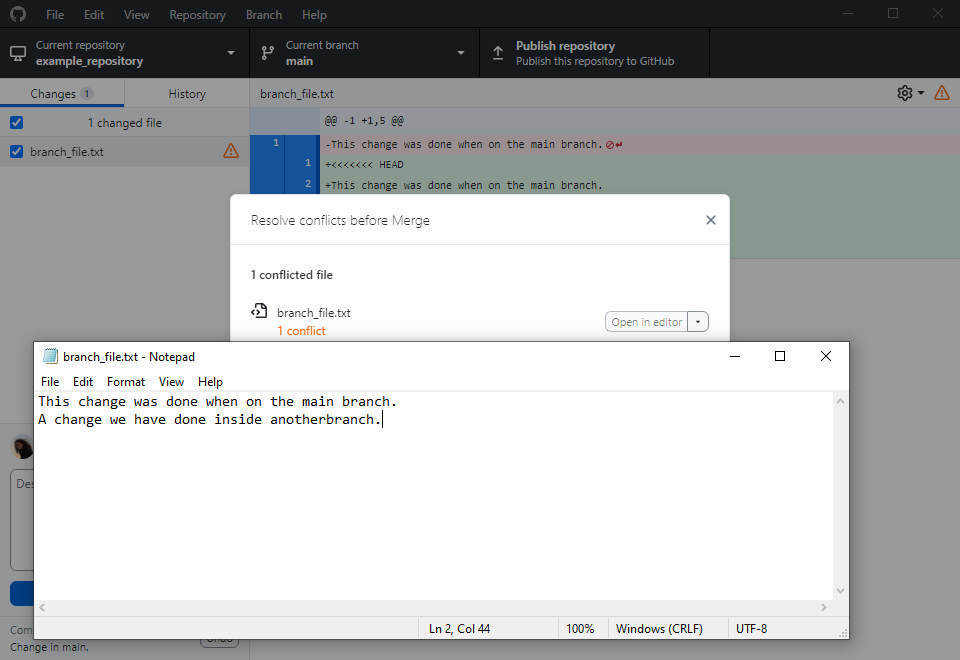
After the file is saved, we can go back to GHD, and we will be met with a pleasant surprise.
A green tick, the good kind.
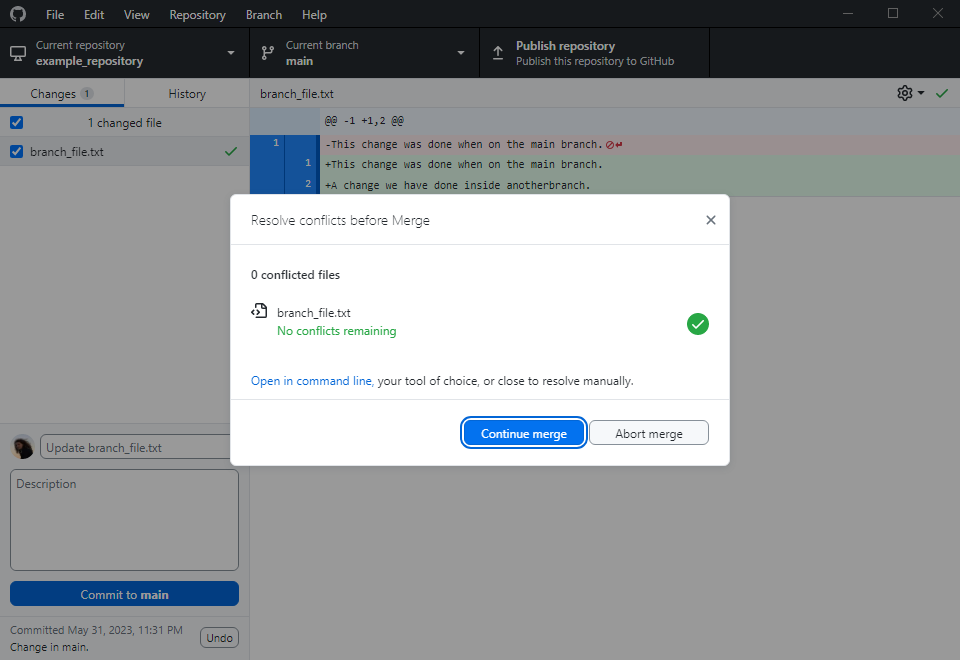
With No conflicts remaining, we can Continue merge, which will finish the process.
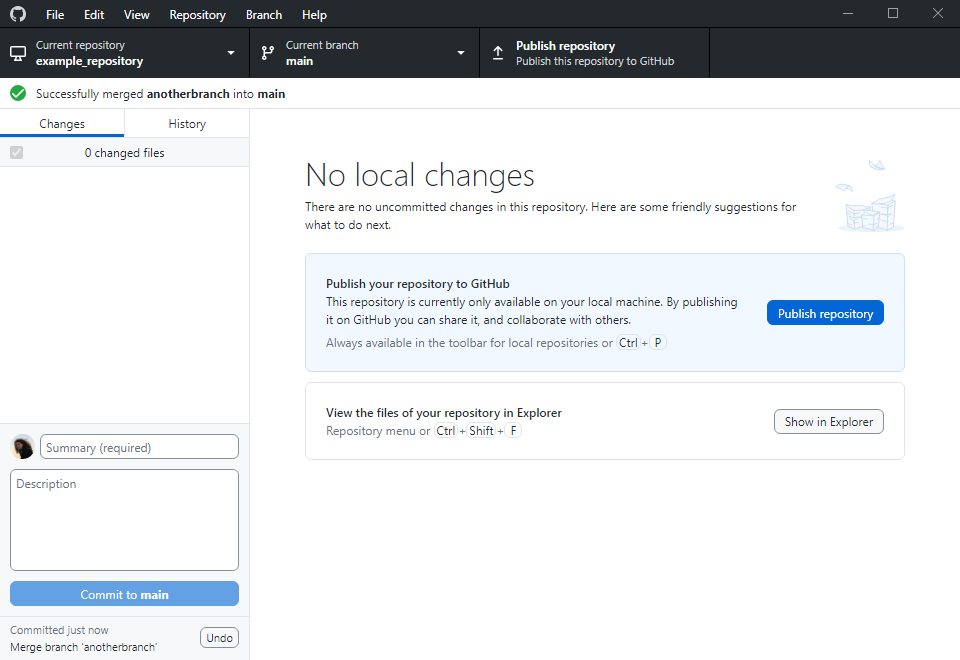
Yay, I was fast enough to grab the confirmation message that time! "Successfully merged anotherbranch into main".
If we click over to the History tab, we will be able to do a final revision of our repository so far. I think it looks pretty cool!

Going in the list bottom to top, that being oldest to newest, here are all the commits inside the main branch listed:
- Our very first commit!, the name speaks for itself.
- (Our second commit. would be here, had we not reset it at the end of Part #2)
- First GUI commit., from the start of this tutorial.
- branch_file.txt created., commit that has been merged into main from sidebranch
- Change in anotherbranch., done in anotherbranch but present in main's history because of a merge
- Change in main. follows, being only two minutes younger than Change in anotherbranch.
- Merge branch 'anothebranch', the merge commit resulted from merging anotherbranch into main
And that's all for this part of Git Tutorials. Time for the usual summary of what we have gone over:
- Installing GitHub Desktop, or GHD as I've started calling it
- Orientating yourself in GHD, creating commits
- What branches are
- How to create new branches and switch between them
- How merging works and what are merge commits
- What merge conflicts inside conflict files are
- How to solve merge conflicts
A pretty short summary for a drastically long tutorial. I swear I will make Part #4 shorter than this.
...I'll try to, at least.
But for now, this is it. As always, thank you for reading if you made it all the way here!